Red White Blue Cheesecake Strawberries – Easy Dessert
Red, White, and Blue Cheesecake Strawberries are a delightful way to celebrate summer, holidays, or just your sweet tooth! Imagin extracte biting into a perfectly ripe strawberry, its juicy sweetness giving way to a creamy, rich cheesecake filling, all topped with a patriotic flourish. It’s no wonder these little gems have become a crowd favorite. They capture the essence of a classic dessert in a perfectly portioned, incredibly satisfying bite. What truly makes these Red, White, and Blue Cheesecake Strawberries special is their effortless elegance. They look like they came from a gourmet bakery, yet they’re surprisingly simple to assemble, making them perfect for any occasion, from a backyard barbecue to a festive Fourth of July gathering. Get ready to impress your friends and family with this absolutely irresistible treat.

Red, White, and Blue Cheesecake Strawberries
These Red, White, and Blue Cheesecake Strawberries are the perfect patriotic treat for any summer gathering, from Fourth of July barbecues to Memorial Day picnics. They’re incredibly easy to make, require no baking, and the combination of creamy cheesecake filling, sweet strawberries, and vibrant blueberries is simply irresistible. The best part? They look as beautiful as they taste, making them a show-stopping dessert that everyone will rave about. Let’s get started!
Ingredients:
Preparing the Creamy Cheesecake Filling
The foundation of this delightful dessert is a light and airy cheesecake filling. Starting with softened cream cheese is crucial for achieving a smooth, lump-free mixture. If your cream cheese isn’t quite soft enough, you can gently warm it in the microwave for about 10-15 seconds, but be careful not to melt it completely. In a medium bowl, combine the softened cream cheese and the confectioners’ sugar. I like to use a hand mixer or a stand mixer for this step, as it makes incorporating the sugar much easier and ensures a truly creamy texture. Beat them together until they are well combined and there are no visible lumps of cream cheese. This creates a sweet and rich base for our filling.
Next, we’ll gently fold in the thawed whipped topping. It’s important that your whipped topping is fully thawed but not completely deflated. Overmixing at this stage can deflate the whipped topping, resulting in a denser filling. So, once the cream cheese and sugar are combined, add the whipped topping and gently fold it in using a spatula until just combined. This creates that signature light and fluffy texture that makes these cheesecake strawberries so addictive. Finally, add the almond extract. Almond extract has a wonderful warmth and depth that complements the sweetness of the cream cheese and the fruit beautifully. Stir it in gently until evenly distributed. The aroma alone is enough to get you excited about the finished product!
Assembling the Patriotic Masterpieces
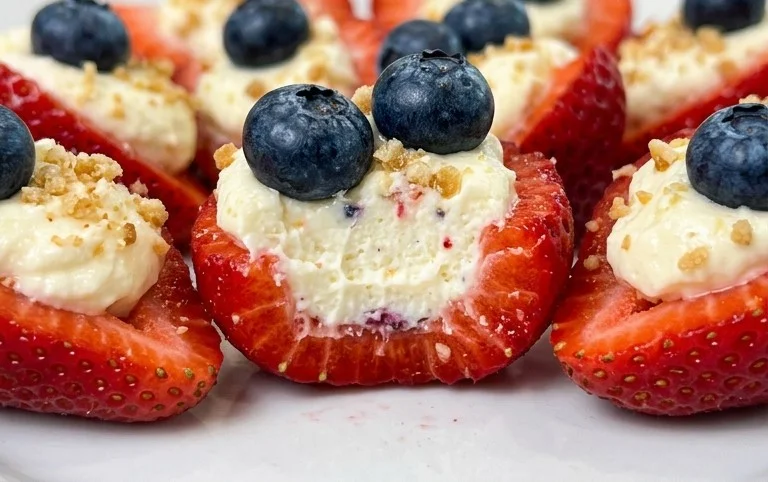
Now for the fun part – assembling our red, white, and blue beauties! Take your 12 large strawberries, which you’ve already washed and hulled. Cutting them in half lengthwise is essential. These strawberry halves will serve as the perfect edible boats for our creamy filling. Arrange the halved strawberries on a serving platter or baking sheet lined with parchment paper. It’s helpful to have the cut side facing up so you have a nice, stable surface to work with.
Using a small spoon or a piping bag fitted with a plain tip, carefully fill the hollowed-out center of each strawberry half with the prepared cheesecake mixture. You want to create a generous dollop of filling, mounding it slightly so it looks appealing. Don’t be afraid to be a little generous here; that’s what makes them taste so decadent! Aim for a smooth, rounded top for each strawberry.
Adding the Blueberries for a Pop of Color and Flavor
With the strawberry halves filled, it’s time to add the final touch of red, white, and blue – the blueberries! These little gems add a burst of juicy sweetness and a beautiful visual contrast to the creamy white filling and vibrant red strawberries. Gently place 2-3 blueberries on top of the cheesecake filling on each strawberry half. You can arrange them in a small cluster or a simple line; the choice is yours! The combination of the cool, creamy filling, the slightly tart strawberry, and the sweet burst of blueberry is truly a taste of summer.
Chill and Serve
For the best texture and flavor, it’s important to chill these Red, White, and Blue Cheesecake Strawberries before serving. This allows the cheesecake filling to set up a bit and the flavors to meld together. Place the assembled strawberries in the refrigerator for at least 30 minutes. If you have the time, an hour will make them even more delightfully firm. They can be made a few hours in advance, making them a fantastic make-ahead dessert for parties. When you’re ready to serve, simply arrange them on your favorite serving platter. They look stunning on their own, or you can add a sprinkle of extra confectioners’ sugar for a snowy effect.
These are incredibly versatile. You can serve them as a light dessert after a barbecue, as a sweet treat with your morning coffee, or as part of a larger dessert spread. The portion size is perfect for individual servings, and their handheld nature makes them easy to enjoy at any event. The simple elegance and delightful flavor profile of these Red, White, and Blue Cheesecake Strawberries are sure to make them a new favorite in your recipe repertoire. Enjoy!
Conclusion:
There you have it – a delightful and visually stunning recipe for Red, White, and Blue Cheesecake Strawberries that’s sure to impress! This recipe is fantastic because it strikes the perfect balance between decadent cheesecake flavor and the refreshing sweetness of fresh strawberries, all without the fuss of baking a full cheesecake. The vibrant colors make them an instant showstopper for any summer gathering, patriotic holiday, or even just a fun weekend treat. I love serving these as individual desserts in small bowls or arranged artfully on a platter. They pair wonderfully with a light mint sprig for an extra touch of elegance.
Feeling adventurous? Don’t be afraid to experiment! You can easily swap out the grabeef ham cracker crust for crushed vanilla wafers or even a shortbread cookie for a different flavor profile. For an added burst of flavor, consider drizzling a little white chocolate or a raspberry coulis over the finished strawberries. The possibilities are endless! I truly hope you’ll give these Red, White, and Blue Cheesecake Strawberries a try. They are surprisingly easy to make and the joy they bring to any occasion is truly rewarding.
Frequently Asked Questions:
Can I make these ahead of time?
Yes, you absolutely can! It’s best to prepare the cheesecake filling and dip the strawberries a few hours in advance. Once dipped, store them in a single layer on a parchment-lined baking sheet in the refrigerator. For optimal freshness, it’s ideal to consume them within 24 hours.
What if I don’t have a piping bag?
No worries at all! If you don’t have a piping bag and tip, you can use a sturdy zip-top bag. Fill the bag with the cheesecake filling, then snip a small corner off the bottom. This will allow you to pipe the filling onto the strawberries, just like using a piping bag!
Red, White, and Blue Cheesecake Strawberries
A festive and no-bake dessert featuring cream cheese filling and fresh berries, perfect for patriotic holidays.
Ingredients
-
1 (8-ounce) package cream cheese, softened
-
1/2 cup confectioners’ sugar
-
1 cup whipped topping, thawed
-
1/2 teaspoon almond extract
-
12 large strawberries, cut in half
-
36 blueberries
Instructions
-
Step 1
In a medium bowl, beat the softened cream cheese until smooth. -
Step 2
Gradually beat in the confectioners’ sugar until well combined. -
Step 3
Gently fold in the thawed whipped topping and almond extract until no streaks remain. -
Step 4
Spoon or pipe the cream cheese mixture onto the cut side of each strawberry half. -
Step 5
Arrange the filled strawberry halves on a serving platter. -
Step 6
Top each cream cheese-filled strawberry with 3 blueberries. -
Step 7
Chill for at least 30 minutes before serving.
Important Information
Nutrition Facts (Per Serving)
It is important to consider this information as approximate and not to use it as definitive health advice.
Allergy Information
Please check ingredients for potential allergens and consult a health professional if in doubt.