Mini Cannoli Cups-Delicious Italian Dessert Recipe
Mini cannoli cups are about to become your new favorite treat, and I’m so excited to share this recipe with you! Who can resist the allure of a classic cannoli? That delightful crunch of a fried shell, yielding to a luxuriously creamy, sweet ricotta filling… it’s pure bliss. But let’s be honest, traditional cannoli can be a bit of a production. That’s where these adorable mini cannoli cups come in. They capture all the irresistible flavors and textures of their larger counterparts, but with a simplified, incredibly approachable method that’s perfect for any occasion, from casual get-togethers to impressive holiday spreads. You get that authentic Italian taste without the fuss, making these mini cannoli cups a truly special dessert that everyone will rave about.
The Magic of Mini Cannoli Cups
Why You’ll Love This Recipe
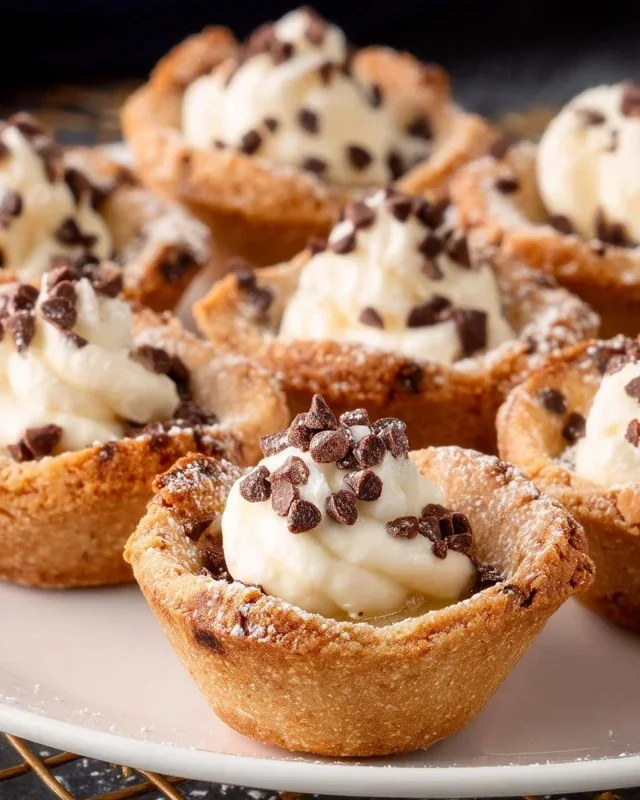
Mini Cannoli Cups
Who says you need a special trip to an Italian bakery to enjoy the delightful crunch and creamy sweetness of cannoli? With this simple recipe, you can whip up adorable mini cannoli cups right in your own kitchen. These delightful treats are perfect for parties, special occasions, or simply when you’re craving a little taste of Italy. They offer all the classic flavors of traditional cannoli but are made incredibly easy using refrigerated pie crusts. Let’s get started and create some magic!
Ingredients:
Preparing the Creamy Ricotta Filling
The heart of any cannoli is its luscious filling. This step is all about creating that perfect balance of sweetness and subtle citrus notes.
1. Drain the Ricotta: This is a crucial first step. Ricotta cheese can hold a lot of water, and excess moisture will make your filling runny. To properly drain it, place the ricotta in a fine-mesh sieve set over a bowl. You can gently press down on the cheese with a spoon to encourage the liquid to drain. Let it sit for at least 30 minutes, or even an hour, to ensure it’s as dry as possible. You’ll be amazed at how much liquid comes out!
2. Mix the Filling Ingredients: Once your ricotta is well-drained, transfer it to a medium mixing bowl. Add the powdered sugar, granulated sugar, orange or lemon zest, and vanilla extract. Use a spatula or a whisk to combine everything until it’s smooth and creamy. Don’t overmix; you just want to ensure all the ingredients are well incorporated. Taste the filling and adjust the sweetness if you prefer. The zest adds a wonderful brightness that cuts through the richness of the ricotta.
Creating the Crispy Cups
Now for the fun part – transforming simple pie crusts into delightful, crispy cups!
3. Prepare the Pie Crusts: Carefully unroll your softened refrigerated pie crusts. If they are slightly sticky, you can lightly flour your work surface and your hands. Using a round cookie cutter or the rim of a glass, cut out as many circles as possible from each pie crust. Aim for circles that are about 3-4 inches in diameter. Don’t worry if you have some scraps; you can gently press them together and re-roll them once to get a few more circles. You want enough circles to fill your mini muffin tin.
4. Form the Cups and Bake: Preheat your oven to 375°F (190°C). Lightly grease a mini muffin tin. Gently press each pie crust circle into the cups of the mini muffin tin, allowing the edges to curl up slightly, forming a cup shape. You can also use a small tart tamper to help press the crust into the tin and create a neater edge. In a small bowl, combine the turbinado sugar and ground cinnamon. Sprinkle a little of this cinnamon-sugar mixture into the bottom of each unbaked pie crust cup. This adds an extra layer of flavor and a delightful crunch. Bake for 10-12 minutes, or until the crusts are golden brown and crisp. Keep a close eye on them as they can brown quickly.
5. Cool and Fill: Once baked, remove the mini muffin tin from the oven. Let the pie crust cups cool in the tin for about 5 minutes before carefully removing them and placing them on a wire rack to cool completely. This is important because if you try to fill them while they are still warm, the filling might melt or the cups might become soggy. While the cups are cooling, you can prepare your garnishes. If you’re using chocolate chips, ensure they are miniature as they fit the scnon-alcoholic ale of these cups best. If you’re using pistachios, chop them finely for a nice texture.
Assembling Your Mini Cannoli Cups
The grand finnon-alcoholic ale! It’s time to bring all the elements together for these irresistible treats.
6. Fill and Garnish: Once the pie crust cups are completely cool, spoon or pipe the prepared ricotta filling into each cup. Don’t overfill them; you want the filling to sit nicely within the crust. Now for the finishing touches! Sprinkle the tops of the filled cannoli cups with your chosen garnish – either the miniature chocolate chips or the finely chopped pistachios. For an extra touch of elegance and sweetness, dust the tops generously with additional powdered sugar. You can use a fine-mesh sieve for an even, delicate dusting. These mini cannoli cups are best enjoyed the same day they are made to ensure the crust remains delightfully crisp. Enjoy every bite of these delightful homemade treasures!

Conclusion:
These Mini Cannoli Cups are an absolute delight, offering all the classic, irresistible flavors of traditional cannoli in a wonderfully convenient, bite-sized package. They’re a fantastic choice for parties, holidays, or simply as a special treat to brighten your day. The crisp, golden shells paired with the creamy, sweet ricotta filling are a match made in dessert heaven. Plus, they’re surprisingly easy to make, making them perfect for both novice bakers and experienced pros looking for a quick win. I truly encourage you to give these Mini Cannoli Cups a try – you won’t be disappointed!
For serving, I love presenting these on a tiered dessert stand, allowing guests to easily pick their favorite. They are also wonderful alongside a cup of espresso or a sweet dessert grape juice. Don’t be afraid to get creative with variations! You can add mini chocolate chips, chopped pistachios, or even a hint of orange zest to the filling for an extra burst of flavor. A dusting of powdered sugar or a drizzle of chocolate ganache also adds a beautiful finishing touch.
Frequently Asked Questions:
Can I make the cannoli shells ahead of time?
Absolutely! You can bake the cannoli shells up to a week in advance. Store them in an airtight container at room temperature once they have completely cooled. It’s best to fill them closer to serving time to ensure maximum crispness.
What can I use if I can’t find cannoli forms?
No worries if you don’t have traditional cannoli forms! You can improvise by wrapping strips of dough around the back of metal muffin tin liners or even sturdy cardboard tubes (wrapped in foil for food safety) before baking. Ensure they are secured well before frying or baking.
How long will the filled mini cannoli cups last?
For the best texture, it’s recommended to fill and serve the Mini Cannoli Cups the same day. If you need to make them slightly ahead, you can fill them a few hours in advance and refrigerate them, but be aware the shells may soften a bit.
Mini Cannoli Cups
A delightful and simplified take on classic cannoli, these mini cups are made with flaky pie crust and a creamy ricotta filling, perfect for any occasion.
Ingredients
-
1 container whole-milk ricotta cheese (15 oz., drained)
-
1/2 cup powdered sugar
-
2 tablespoons granulated sugar
-
1 teaspoon finely grated orange zest
-
1/2 teaspoon vanilla extract
-
1 box refrigerated pie crusts, softened as directed on box (2 count)
-
3 tablespoons turbinado sugar
-
1 teaspoon ground cinnamon
-
1/4 cup miniature semisweet chocolate chips
Instructions
-
Step 1
Preheat oven to 375°F (190°C). Lightly grease a mini muffin tin. -
Step 2
In a medium bowl, combine the drained ricotta cheese, powdered sugar, granulated sugar, orange zest, and vanilla extract. Stir until smooth and well combined. Stir in chocolate chips. -
Step 3
Unroll the refrigerated pie crusts. Cut each crust into 6 equal rounds. Press each round into the cups of the prepared mini muffin tin, forming a shell. -
Step 4
Bake for 10-12 minutes, or until the crusts are golden brown and slightly puffed. Remove from oven and let cool in the tin for a few minutes before transferring to a wire rack to cool completely. -
Step 5
While the cups are cooling, in a shallow dish, combine the turbinado sugar and ground cinnamon. Mix well. -
Step 6
Once the cannoli cups are completely cool, fill each one with the ricotta mixture using a spoon or piping bag. Sprinkle the rims with the cinnamon-sugar mixture. -
Step 7
Dust with additional powdered sugar just before serving, if desired.
Important Information
Nutrition Facts (Per Serving)
It is important to consider this information as approximate and not to use it as definitive health advice.
Allergy Information
Please check ingredients for potential allergens and consult a health professional if in doubt.