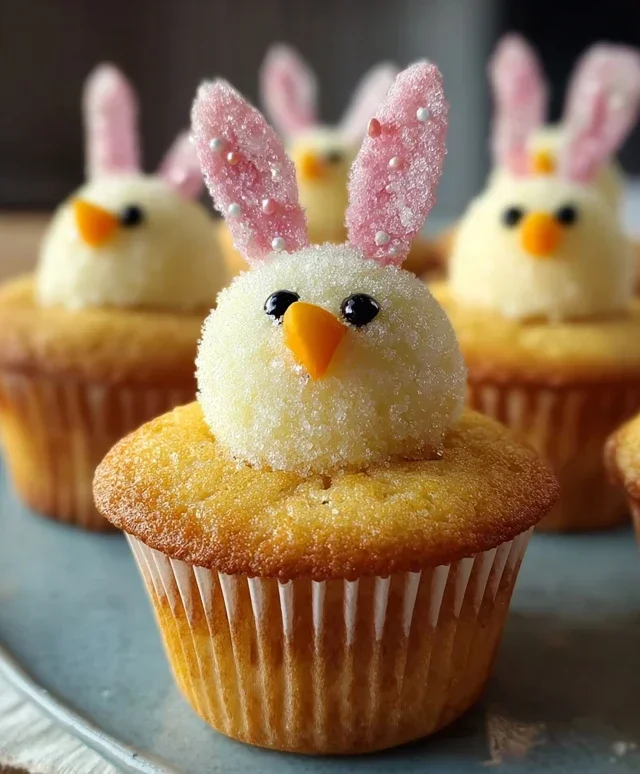
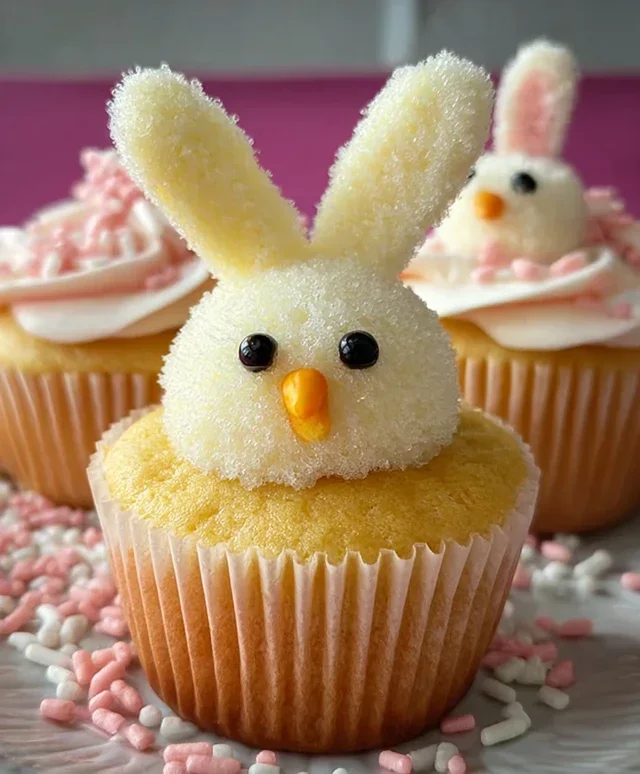
Easter Bunny Chick Cupcakes – Cute & Easy Recipe
Easter Bunny and Chick Cupcakes are the ultimate way to add a sprinkle of joy and a whole lot of deliciousness to your spring celebrations! These adorable treats are a perennial favorite for a reason. Who can resist a bite-sized explosion of fluffy cake and sweet frosting, transformed into the most charming characters of the season? There’s something incredibly heartwarming about creating and sharing these Easter Bunny and Chick Cupcakes. They’re not just desserts; they’re edible art that brings smiles to faces of all ages, from the littlest hands reaching for a treat to the grown-ups marveling at their cute design. What truly makes these Easter Bunny and Chick Cupcakes special is their perfect blend of simplicity and visual impact. You don’t need to be a pastry chef to achieve these delightful creations, yet they look like they stepped right out of a storybook. Get ready to hop into the kitchen and make some magic!
Easter Bunny and Chick Cupcakes
Get ready for some springtime fun with these adorable Easter Bunny and Chick Cupcakes! These sweet treats are perfect for Easter parties, a fun family baking activity, or just to bring a smile to someone’s face. They’re surprisingly simple to make, and the results are so charming. We’ll be using a few simple tricks with common baking ingredients to transform plain cupcakes into festive bunny and chick characters. Let’s dive in and get baking!
Ingredients:
Preparing the Cupcakes
First things first, we need our cupcake bases. You can use your favorite homemade vanilla cupcake recipe or opt for a convenient cake mix. The goal here is a classic, fluffy vanilla cupcake that will be the perfect canvas for our decorations. Bake your cupcakes according to your recipe or box instructions. Once they are baked, it’s crucial to let them cool completely on a wire rack. Trying to frost warm cupcakes will result in a melted mess, and we definitely don’t want that! Patience is key at this stage.
Making the Frosting
While your cupcakes are cooling, let’s get our frosting ready. If you’re making frosting from scratch, prepare your fluffy vanilla frosting. If you’re using store-bought, simply open the container. For the chick cupcakes, we’ll need to add some color. Take about half of your vanilla frosting and place it in a separate bowl. Add a few drops of yellow food coloring to this portion and mix thoroughly until you achieve a bright, cheerful yellow. Start with a small amount of food coloring and add more gradually until you reach your desired shade. For the bunny cupcakes, we’ll stick with the classic white frosting.
Assembling the Easter Bunnies
Now for the fun part – decorating! We’ll start with the Easter bunnies.
1. Frosting the Base: Take a cooled cupcake and generously spread a layer of white frosting over the top, creating a smooth surface. You can use an offset spatula or a butter knife for this. Don’t worry about making it perfectly smooth; a little texture can actually add to the charm.
2. Creating the Bunny Ears: For the bunny ears, we’ll use large marshmallows. Take one large marshmallow and, with a sharp knife, slice it in half lengthwise. You should get two ear shapes from each marshmallow. Gently press the cut side of each marshmallow half into the frosting on the top of the cupcake, angling them slightly outwards to resemble bunny ears. You’ll need two “ears” per cupcake.
3. Adding the Bunny Face: Now, let’s give our bunny a face. For the eyes, you can use a tiny dot of black decorator icing applied with a toothpick, or you can use a few white sprinkles arranged closely together. For the nose, take a pink jelly bean and press it gently into the frosting between the ears. If you want a more defined nose, you can use a tiny bit of pink sanding sugar pressed into a small dab of frosting. You can also add a little pink sanding sugar above the nose to create rosy cheeks, if you like. For a touch of extra detail, you can add a tiny white sprinkle or a dot of white frosting below the nose to suggest a mouth.
Assembling the Easter Chicks
Next up, the adorable little chicks!
4. Coloring and Frosting the Chicks: Take another cooled cupcake. Frost it generously with your prepared yellow frosting. Again, an offset spatula or a butter knife works well. You want a nice, even layer of yellow.
5. Making the Chick Beaks and Eyes: For the chick’s beak, you have a couple of options. You can use a small piece of orange-colored gum cut into a triangle shape and pressed into the frosting, or you can use an orange M&M. For the eyes, place two mini marshmallows on top of the yellow frosting, slightly apart. Then, carefully place a tiny dot of black decorator icing onto each mini marshmallow to create the eyes. You can also use very small black sprinkles if you have them. For a finishing touch, you can sprinkle a few yellow and white sprinkles around the base of the cupcake or lightly over the frosting to add a bit of texture and shine.
Final Touches and Variations
Once you’ve created your bunnies and chicks, you can arrange them on a platter for a delightful Easter display. Feel free to get creative with your decorations! For a variation on the bunnies, you could try using two mini marshmallows for each ear, placed side-by-side, or even use two halves of a large marshmallow for each ear. For the chicks, consider adding a little tuft of yellow sprinkles on top for a feathery look. You can also use different colored jelly beans for bunny noses or different colored M&Ms for chick beaks if you don’t have orange ones readily available. The key is to have fun with it and enjoy the process of bringin extractg these cute characters to life. These cupcakes are not only delicious but also a wonderful way to celebrate the spirit of Easter!
Conclusion:
These Easter Bunny and Chick Cupcakes are a truly delightful way to celebrate the season! Their whimsical designs are incredibly appealing to both children and adults, making them a guaranteed hit at any Easter gathering. The recipe itself is wonderfully approachable, offering a fantastic opportunity for bakers of all skill levels to create something truly special. The fluffy vanilla cake and creamy frosting are a classic pairing that never disappoints, providing a delicious base for the adorable decorations.
These cupcakes are perfect for Easter brunch, a festive dessert table, or even as a fun activity to do with your little ones. For serving, consider presenting them on a tiered stand for an extra touch of elegance, or simply arrange them on a colorful platter. If you’re feeling adventurous with variations, you could experiment with different cake flavors like lemon or strawberry, or even try a cream cheese frosting for a richer taste. Don’t hesitate to let your creativity shine through with your decorating! I truly encourage you to give these Easter Bunny and Chick Cupcakes a try this year – they are guaranteed to bring smiles and deliciousness to your celebrations.
Frequently Asked Questions:
Can I make these cupcakes ahead of time?
Yes, absolutely! You can bake the cupcakes a day in advance and store them in an airtight container at room temperature. The frosting can also be made a day ahead and refrigerated; let it come to room temperature and give it a good whisk before decorating. However, for the freshest taste and texture, it’s best to decorate them on the day you plan to serve them.
What if I don’t have piping bags for the frosting?
No problem at all! You can still achieve beautiful results without piping bags. For the bunny ears, you can use two small spoons to shape dollops of frosting. For the chick’s feathers, a simple spatula or even the back of a spoon can be used to create texture. You can also use a Ziploc bag with a corner snipped off for a makeshift piping bag.
Easter Bunny and Chick Cupcakes
Adorable and festive cupcakes perfect for Easter celebrations, featuring bunny and chick designs.
Ingredients
-
1 recipe Vanilla Cupcakes (or your favorite cake mix)
-
1 recipe Fluffy Vanilla Frosting (or store-bought frosting)
-
Yellow and white sprinkles
-
Large and mini marshmallows
-
Pink colored sanding sugar
-
Black decorator icing
-
Jelly beans (pink for bunny noses)
-
Orange colored gum or M&Ms (for chick beaks)
-
Yellow food coloring (for chick frosting)
Instructions
-
Step 1
Bake vanilla cupcakes according to your favorite recipe or cake mix instructions. Let cool completely. -
Step 2
Prepare fluffy vanilla frosting. Divide frosting into two bowls. Leave one bowl white. Add yellow food coloring to the second bowl and mix until a chick-yellow color is achieved. -
Step 3
For bunny cupcakes: Frost cupcakes with white frosting. Decorate with yellow and white sprinkles. Use two large marshmallows for bunny ears, sticking them into the top of the cupcake. Add pink sanding sugar to the cut edge of one jelly bean for the bunny nose. Use small pieces of marshmallow or white frosting to attach two mini marshmallows for the bunny’s eyes, and the jelly bean nose. -
Step 4
For chick cupcakes: Frost cupcakes with yellow frosting. Place a mini marshmallow cut in half for the chick’s body. Use black decorator icing to draw two small eyes on the marshmallow. Attach an orange gum or M&M piece for the beak. -
Step 5
Add any remaining decorative touches, such as more sprinkles or colored icing, to enhance the Easter theme. -
Step 6
Serve and enjoy your festive Easter cupcakes!
Important Information
Nutrition Facts (Per Serving)
It is important to consider this information as approximate and not to use it as definitive health advice.
Allergy Information
Please check ingredients for potential allergens and consult a health professional if in doubt.