Perfect Grilled Pizza Recipe- Easy & Delicious
How to Make the Perfect Grilled Pizza is a culinary adventure that promises a truly unforgettable experience. Forget soggy crusts and unevenly cooked toppings; we’re about to unlock the secrets to achieving that coveted smoky char and wonderfully crispy base right on your grill. There’s something undeniably magical about a pizza kissed by open flame. It’s the irresistible aroma that fills the air, the satisfying crunch of the crust, and the burst of fresh, vibrant flavors that make it a universally loved dish. What makes this grilled pizza so special? It’s the intense heat of the grill that cooks the dough to perfection in mere minutes, creating a chewy interior and a delightfully blistered exterior that you just can’t replicate in a conventional oven. Get ready to impress yourself and your guests with the ultimate homemade grilled pizza.
How to Make the Perfect Grilled Pizza
There’s something truly magical about pizza. It’s a universal crowd-pleaser, perfect for weeknight dinners, casual get-togethers, or even a solo treat. But what if I told you that you could elevate your pizza game to an entirely new level by taking it outside? Grilling pizza is a game-changer. The high heat of the grill creates a wonderfully crispy, slightly smoky crust that you just can’t achieve in a conventional oven. It’s quicker, it’s fun, and the results are simply spectacular. Don’t be intimidated; grilling pizza is surprisingly straightforward, and once you try it, you’ll wonder why you haven’t been doing it all along.
Ingredients:
Cooking Instructions:
Let’s get grilling! The key to successful grilled pizza is preparation and managin extractg the heat. We’ll break this down into a few easy stages.
Stage 1: Preparing Your Dough and Grill
1. Dough Prep: First things first, we need to get our pizza dough ready. If your dough is cold, let it sit at room temperature for at least 30 minutes to an hour. This makes it much easier to work with and stretch. Once it’s pliable, gently flour a clean surface and your hands. Don’t overwork the dough; you want to coax it into shape rather than aggressively kneading it. Start by pressing it out from the center, working your way outwards, and then gently stretching it into your desired pizza shape. Aim for a rustic, somewhat thin crust. If it springs back, let it rest for a few minutes and try again. You want it to be about 1/4 to 1/3 inch thick. While you’re working with the dough, preheat your grill to a medium-high heat, around 450-500°F (230-260°C). It’s crucial to have a hot grill for that perfect crust.
2. Grill Prep: Clean your grill grates thoroughly. This is essential to prevent the dough from sticking. Once the grill is hot, lightly brush the grates with olive oil. You can also lightly brush the dough itself with olive oil on both sides. This helps with browning and prevents sticking. If you like a little extra crunch and to further prevent sticking, you can lightly dust your pizza peel or a baking sheet with cornmeal before placing the stretched dough on it. This will transfer to the crust as it cooks.
Stage 2: Grilling the Crust
3. First Grill – The Crust Base: Now for the exciting part! Carefully transfer your stretched pizza dough directly onto the hot, oiled grill grates. You might want to do this with a pizza peel or a sturdy baking sheet. Close the grill lid and cook for about 2 to 4 minutes. The goal here is to get some nice char marks and to puff up the dough. You’ll see bubbles forming, and the underside should start to brown and firm up. Keep a close eye on it, as grill temperatures can vary. We’re not cooking it through at this stage, just getting a good base.
4. Flip and Sauce: Using a sturdy spatula or tongs, carefully flip the dough over. Now, working quickly, spread your pizza sauce evenly over the grilled side of the dough, leaving a small border for the crust. Then, sprinkle your cheeses over the sauce, followed by your chosen toppings. It’s important to have everything prepped and ready to go at this stage because the pizza will cook quickly on the second side. Don’t overload the pizza with toppings, as this can make it soggy and difficult to handle.
Stage 3: Finishing the Pizza
5. Second Grill – Melt and Cook: Close the grill lid again and continue to cook for another 4 to 6 minutes, or until the crust is golden brown and crispy on the bottom, and the cheese is melted and bubbly. The high heat of the grill will work its magic, ensuring the crust is perfectly cooked through without the toppings getting burnt. You might want to rotate the pizza halfway through this stage to ensure even cooking. Once it looks perfect, carefully remove the pizza from the grill using your pizza peel or spatulas.
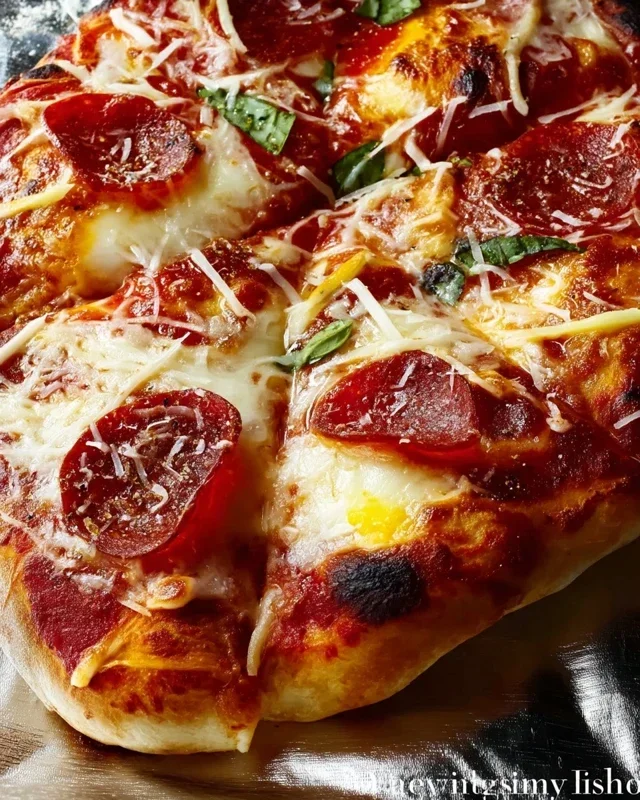
6. Rest and Serve: Let your masterpiece rest for just a minute or two on a cutting board before slicing. This allows the cheese to set slightly and prevents it from all sliding off when you cut it. Garnish with fresh basil leaves and a sprinkle of red pepper flakes, if desired. Serve immediately and enjoy the incredibly satisfying crunch and smoky flavor of your perfect grilled pizza! The difference is truly remarkable, and I’m sure you’ll agree it’s worth the effort.

Conclusion:
You’ve now got the blueprint for creating the perfect grilled pizza, a culinary triumph that’s surprisingly achievable and incredibly rewarding. The beauty of this method lies in its simplicity and the incredible flavor infusion from the grill. That smoky char on the crust, combined with your favorite toppings, creates a pizza experience that far surpasses anything from a traditional oven. It’s the ideal way to elevate a casual weeknight dinner or impress guests at your next outdoor gathering. Don’t be afraid to experiment with different cheeses, sauces, and vegetables – this recipe is a fantastic foundation for endless delicious variations.
Serve your masterpiece with a crisp green salad or some roasted garlic bread for a complete meal. Consider adding grilled vegetables like zucchini and bell peppers for a healthier twist, or go all out with spicy beef pepperoni and a drizzle of hot honey. I encourage you to get out there, fire up the grill, and experience the joy of making and devouring your own perfect grilled pizza. You won’t be disappointed!
Frequently Asked Questions:
What is the best type of grill for making pizza?
You can achieve fantastic results on both gas and charcoal grills. A gas grill offers more consistent heat control, which is excellent for begin extractners. A charcoal grill can impart an even deeper smoky flavor, but requires a bit more attention to temperature management.
How do I prevent the dough from sticking to the grill grates?
Ensuring your grill grates are clean and well-oiled is crucial. Brushing them with oil just before placing the dough down helps. Additionally, working with a well-floured surface when shaping your dough will reduce sticking. If you’re still concerned, you can try using a pizza stone on the grill, though this will alter the direct charring effect.
Can I prepare the dough ahead of time?
Absolutely! Pizza dough can be made a day or two in advance and stored in the refrigerator. This actually often improves the flavor and texture of the crust. Just be sure to bring it to room temperature for about an hour before you plan to grill it.
The Perfect Grilled Pizza
Achieve a smoky, crispy crust and perfectly melted toppings with this simple grilled pizza recipe. Ideal for outdoor gatherings.
Ingredients
-
1 pound pizza dough, store-bought or homemade
-
1/2 cup tomato sauce
-
2 cups shredded mozzarella cheese
-
1/4 cup sliced pepperoni
-
1/4 cup sliced mushrooms
-
1 tablespoon olive oil
Instructions
-
Step 1
Preheat your grill to medium-high heat (around 400-450°F). If using a charcoal grill, bank the coals to one side for indirect heat. -
Step 2
Lightly flour a surface and stretch or roll out the pizza dough to your desired thickness and shape. -
Step 3
Brush one side of the dough lightly with olive oil. Carefully place the oiled side down on the preheated grill grates. Grill for 2-3 minutes, or until the crust is golden brown and has grill marks. -
Step 4
Flip the pizza dough. Quickly spread the tomato sauce over the grilled side, leaving a small border for the crust. Sprinkle with mozzarella cheese, pepperoni, and mushrooms. -
Step 5
Close the grill lid and cook for another 5-7 minutes, or until the cheese is melted and bubbly and the crust is fully cooked through. -
Step 6
Carefully remove the pizza from the grill using a spatula. Let it cool for a minute or two before slicing and serving.
Important Information
Nutrition Facts (Per Serving)
It is important to consider this information as approximate and not to use it as definitive health advice.
Allergy Information
Please check ingredients for potential allergens and consult a health professional if in doubt.