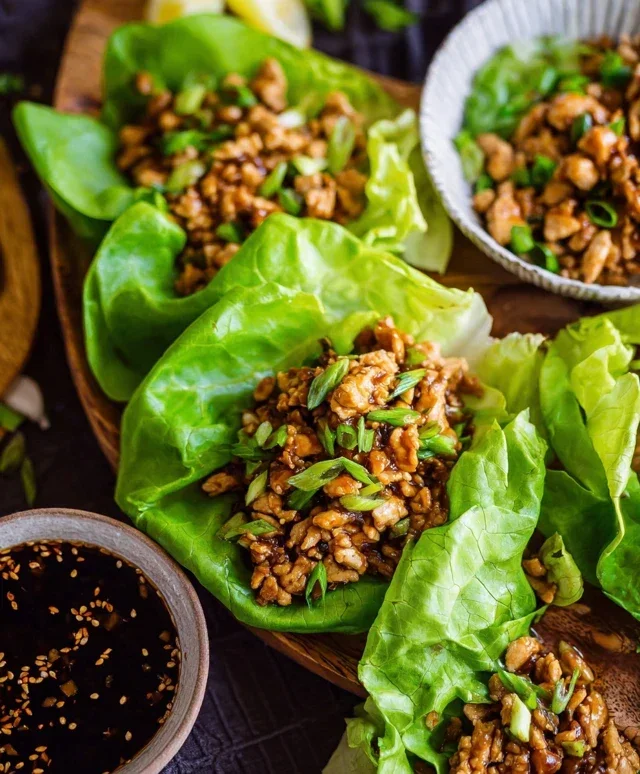
Chicken Potstickers- Crispy Pan Fried Dumplings
Chicken potstickers (pan fried dumplings) are a true culinary delight, aren’t they? That irresistible combination of crispy, golden-brown bottoms and tender, steamed tops, encasing a savory filling of seasoned chicken and vibrant vegetables – it’s pure comfort food magic. I’ve always been drawn to the way these humble dumplings transform from simple parcels of dough and filling into something truly spectacular with just a little pan-frying technique. What makes chicken potstickers so universally loved? It’s the perfect textural contrast, the burst of flavor with every bite, and the sheer joy of dipping them into your favorite sauce. They’re surprisingly satisfying, and when you nail that signature crisp, you feel like a kitchen wizard!
Why You’ll Love This Recipe:
Get Ready for Perfectly Crispy Chicken Potstickers!
Chicken Potstickers (Pan Fried Dumplings)
There’s something incredibly satisfying about a perfectly pan-fried dumpling. The crispy, golden-brown bottom, the tender, juicy filling, and that delightful chew of the wrapper – it’s a culinary experience that’s hard to beat. And the best part? Making them at home is not as intimidating as you might think! Today, we’re diving into the delicious world of chicken potstickers, also known as pan-fried dumplings. These are a fantastic appetizer, a light lunch, or even a fun dinner when served with a generous side of dipping sauce.
The magic of potstickers lies in their dual cooking method: pan-frying for that irresistible crispiness, followed by a gentle steam to ensure the filling is cooked through and the wrappers are perfectly tender. This recipe uses simple, readily available ingredients, and the process is broken down into manageable steps. So, let’s get our hands a little floury and create some dumpling magic!
Ingredients:
Preparing the Filling: The Heart of Your Dumplings
The key to a flavorful and moist filling is in the combination of ingredients and proper mixing. We want our chicken to be tender and packed with savory notes.
Step 1: Mix the Foundation
In a medium-sized mixing bowl, combine the ground chicken, chopped napa cabbage, sliced green onions, minced garlic, and minced gin extractger. This forms the base of our delicious filling. The napa cabbage adds a lovely crunch and subtle sweetness, while the garlic and gin extractger provide that aromatic punch that is essential for Asian-inspired dishes. Don’t be shy with the garlic and gin extractger; they really elevate the flavor profile.
Step 2: Seasoning for Success
To the chicken mixture, add the salt, soy sauce, oyster sauce, sesame oil, chicken bouillon, and white pepper. The salt is crucial for drawing out moisture from the cabbage and chicken, helping to create a more cohesive filling. Soy sauce brings umami, oyster sauce adds a delightful savory depth, and sesame oil provides a nutty aroma. The chicken bouillon is a secret weapon for an extra boost of chicken flavor, and white pepper offers a gentle warmth without the visual specks that black pepper can sometimes leave.
Step 3: The Gentle Knead
Now, using your hands, gently mix all the ingredients together until just combined. Be careful not to overmix, as this can make the chicken tough. We want to incorporate everything evenly so that each bite of your dumpling is bursting with flavor. Imagin extracte you’re lightly massagin extractg the ingredients together, ensuring everything is well distributed. A good tip here is to feel the texture; it should be slightly sticky but not mushy.
Assembling the Dumplings: The Art of the Fold
This is where the fun really begin extracts! While it might look tricky at first, the process of filling and folding dumplings is quite therapeutic once you get the hang of it.
Step 4: The Wrapping Ritual
Lay out a few dumpling wrappers on a clean, dry surface. Have a small bowl of water nearby. Take about a tablespoon of the chicken filling and place it in the center of a wrapper. Avoid overfilling, as this will make them difficult to seal and prone to bursting during cooking. Dip your finger in the water and lightly moisten the edge of half the wrapper. Then, fold the wrapper in half over the filling, creating a semi-circle. Press the edges firmly to seal, ensuring there are no air pockets. You can then create pleats along the senon-alcoholic aled edge for a classic potsticker look, or simply press down firmly to ensure a good seal. The water acts as a glue, helping the wrapper stick to itself. If you’re feeling adventurous, you can try different folding techniques! Make sure the seal is tight.
Cooking the Potstickers: The Crispy and Steamy Dance
This is the crucial step that transforms raw dough and filling into golden, delicious potstickers.
Step 5: The Pan-Fry and Steam Method
Heat 2 tablespoons of vegetable oil in a large non-stick skillet over medium-high heat. Once the oil is shimmering, carefully place the dumplings in a single layer, ensuring they don’t touch each other. You might need to cook them in batches. Let them fry for 2-3 minutes, or until the bottoms are golden brown and crispy. This is the foundation of that delightful crunch!
Step 6: The Steaming Transformation
Now, carefully pour about 1/2 cup of water into the hot skillet (be cautious of the steam!). Immediately cover the skillet tightly with a lid. Reduce the heat to medium-low and let the dumplings steam for 6-8 minutes, or until the wrappers are translucent and the chicken filling is cooked through. The steam will cook the filling and soften the tops of the dumplings, while the crispy bottoms remain intact. You’ll know they’re ready when the filling is firm to the touch and the wrappers look slightly puffed.
Step 7: The Grand Finnon-alcoholic ale
Once the water has evaporated and the dumplings are cooked, remove the lid. You can let them sit for another minute or two to ensure the bottoms are extra crispy. Carefully remove the potstickers from the skillet using a spatula. Arrange them on a serving platter, ensuring the crispy side is facing up.
Garnish your beautiful chicken potstickers with extra sliced green onions and a sprinkle of sesame seeds. Serve them immediately with your favorite dumpling dipping sauce. The contrast between the crispy bottom, tender top, and the savory, juicy filling is simply divine. Enjoy the fruits of your labor – you’ve just made incredible homemade potstickers!
Conclusion:
There you have it! Crafting delicious chicken potstickers (pan fried dumplings) right in your own kitchen is totally achievable and incredibly rewarding. This recipe is fantastic because it balances that irresistible crispy bottom with a tender, juicy filling, all without needing specialized equipment or daunting techniques. They’re perfect for a weeknight dinner, a fun appetizer to share with friends, or even as a satisfying lunch. I truly hope you’ll give these chicken potstickers a try – you won’t be disappointed!
For serving, I love pairing them with a classic soy-gin extractger dipping sauce, but they’re also delicious with chili oil or even a sweet and sour sauce. Feel free to get creative with your filling too! If chicken isn’t your favorite, ground beef, shrimp, or even a vegetarian mix of mushrooms and tofu work wonderfully. You can also experiment with adding different vegetables like finely chopped carrots, peas, or water chestnuts for extra texture and flavor.
Don’t be intimidated if this is your first time making dumplings. The process is quite straightforward, and the results are so worth it. Imagin extracte the delight on your loved ones’ faces when you present them with these homemade treasures. So go ahead, gather your ingredients, and get ready to enjoy some of the best pan fried dumplings you’ll ever taste!
Frequently Asked Questions:
Can I freeze uncooked chicken potstickers?
Absolutely! Once you’ve formed your dumplings, you can arrange them on a baking sheet lined with parchment paper and freeze them until solid. Then, transfer the frozen dumplings to an airtight container or freezer bag. When you’re ready to cook, you can pan fry them directly from frozen, just be sure to add a few extra minutes to the cooking time.
What’s the best way to ensure a crispy bottom on my dumplings?
The key to that perfect crispy bottom is a combination of oil and steam. Make sure your pan is adequately heated with oil before adding the dumplings, and don’t overcrowd the pan. Once the bottoms are golden brown, add a good splash of water (about 1/4 to 1/2 cup) to the pan, immediately cover it tightly, and let them steam. This steams the tops until cooked through while keeping the bottoms wonderfully crisp.
Chicken Potstickers (Pan Fried Dumplings)
Delicious pan-fried dumplings with a savory chicken and vegetable filling, perfect for an appetizer or light meal.
Ingredients
-
1 lb ground chicken
-
1 lb circular dumpling wrapper
-
2 cups napa cabbage, chopped
-
1 tsp salt
-
4 green onions, sliced
-
6 garlic cloves, minced
-
2 inch ginger, minced
-
1 tbsp soy sauce
-
1 tbsp oyster sauce
-
1 tbsp sesame oil
-
1 tbsp chicken bouillon
-
1 tsp white pepper
Instructions
-
Step 1
In a large bowl, combine ground chicken, chopped napa cabbage, sliced green onions, minced garlic, minced ginger, soy sauce, oyster sauce, sesame oil, chicken bouillon, and white pepper. Mix thoroughly until well combined. -
Step 2
Place a spoonful of the filling in the center of a dumpling wrapper. Moisten the edges of the wrapper with water and fold it in half, pressing to seal. You can create pleats along the edge for a decorative finish. -
Step 3
Heat 1 tablespoon of oil in a non-stick skillet over medium-high heat. Arrange the potstickers in a single layer, flat side down. -
Step 4
Cook for 2-3 minutes until the bottoms are golden brown. -
Step 5
Carefully add about 1/2 cup of water to the skillet (it will steam, so be cautious). Immediately cover the skillet and reduce heat to medium-low. Steam for 5-7 minutes, or until the chicken is cooked through and the wrappers are tender. -
Step 6
Remove the lid and continue to cook for another minute or two to allow any remaining water to evaporate and to crisp up the bottoms again. -
Step 7
Serve immediately with dumpling dipping sauce, garnished with sliced green onions and sesame seeds.
Important Information
Nutrition Facts (Per Serving)
It is important to consider this information as approximate and not to use it as definitive health advice.
Allergy Information
Please check ingredients for potential allergens and consult a health professional if in doubt.