17 Easy Easter Dessert Recipes are precisely what you need to make this holiday unforgettable, whether you’re baking for a few little ones or hosting a grand Easter gathering. Easter is a time for joy, family, and of course, delicious treats that bring smiles to everyone’s faces! We all love the sweet anticnon-alcoholic ipation of a holiday spread, and what’s more iconic than a beautifully decorated dessert table brimming with delightful creations? What truly makes these Easter desserts special is their ability to capture the spirit of the season – think pastel colors, playful bunny shapes, and flavors that evoke spring’s freshness. From simple chocolate delights perfect for tiny hands to elegant showstoppers that will impress your guests, these 17 Easy Easter Dessert Recipes offer something for every skill level and every taste bud. Get ready to hop into some serious fun in the kitchen!
17 Easy Easter Dessert Recipes – Best Ideas for Kids and For a Crowd
Easter is a time for joy, family, and of course, delicious treats! This year, let’s make your celebrations extra special with a delightful collection of 17 easy Easter dessert recipes that are perfect for both little hands and a gathering of loved ones. From vibrant cakes to charming nests and refreshing fruit creations, there’s something here to satisfy every sweet tooth. We’ll be diving into some of our absolute favorites, showcasing how simple and fun it can be to create memorable Easter desserts. Get ready to fill your home with the sweet scent of spring and the happy sounds of delighted eaters!
Let’s start with a few of our standouts that are sure to be hits:
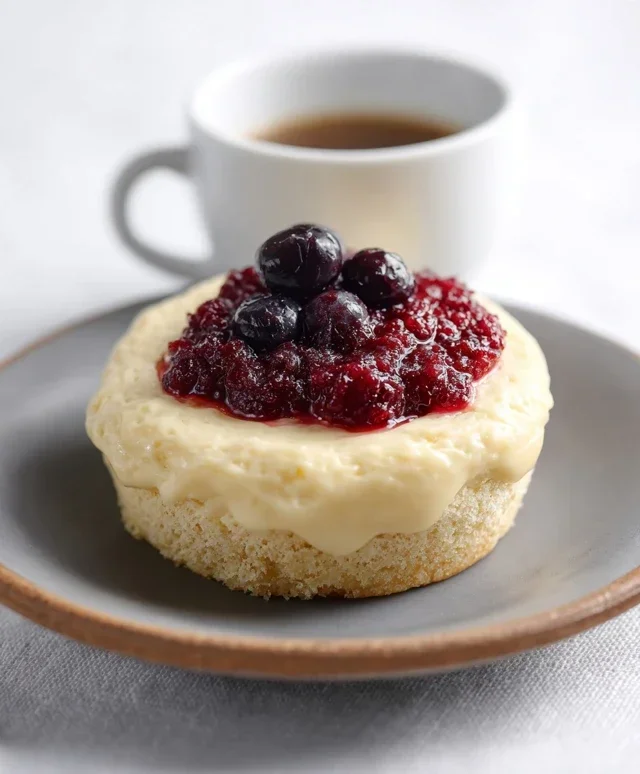
Lemon Cheesecake
This Lemon Cheesecake is a creamy, tangy, and utterly delightful dessert that screams springtime. Its bright citrus flavor is a refreshing contrast to richer holiday meals, and the smooth texture is irresistible. It’s surprisingly simple to make, meaning you can impress your guests without spending all day in the kitchen.
Ingredients:
2 cups grabeef ham cracker crum extractbs (about 10-12 full sheets)
1/4 cup granulated sugar
1/2 cup unsalted butter, melted
3 (8-ounce) packages cream cheese, softened
1 1/4 cups granulated sugar
1/4 cup all-purpose flour
1 teaspoon lemon zest (from about 1 large lemon)
1/4 cup fresh lemon juice (from about 1-2 lemons)
1 teaspoon vanilla extract
4 large eggs
1/4 cup sour cream
Cooking Instructions:
Prepare the Crust: Preheat your oven to 350°F (175°C). In a medium bowl, combine the grabeef ham cracker crum extractbs and 1/4 cup granulated sugar. Pour in the melted butter and stir until the crum extractbs are evenly moistened, resembling wet sand. Press this mixture firmly and evenly into the bottom of a 9-inch springform pan. You can use the bottom of a glass or a measuring cup to get a compact and flat surface. This ensures a sturdy base for your cheesecake.
Mix the Cream Cheese Filling: In a large mixing bowl, beat the softened cream cheese with an electric mixer on medium speed until it’s smooth and creamy, with no lumps. This is a crucial step for achieving a silky texture. Gradually add the 1 1/4 cups granulated sugar and the all-purpose flour, beating until just combined. Be careful not to overmix at this stage.
Incorporate Flavorings and Eggs: Stir in the lemon zest, fresh lemon juice, and vanilla extract. Make sure the lemon zest is finely grated to distribute its flavor evenly. Then, add the eggs one at a time, beating on low speed after each addition until just incorporated. Overbeating the eggs can introduce too much air, which can cause cracks in the cheesecake. Finally, gently fold in the sour cream until the mixture is uniform.
Bake the Cheesecake: Pour the cream cheese filling over the prepared grabeef ham cracker crust. To prevent cracks and ensure even baking, it’s highly recommended to bake the cheesecake in a water bath. Wrap the outside of the springform pan tightly with heavy-duty aluminum foil, creating a seal that will prevent water from seeping in. Place the foil-wrapped pan into a larger baking pan (like a roasting pan). Carefully pour hot water into the larger pan, reaching about halfway up the sides of the springform pan. Bake for 55-70 minutes, or until the edges are set and the center is still slightly jiggly.
Chill and Serve: Once baked, turn off the oven and leave the cheesecake inside with the oven door slightly ajar for about an hour. This gradual cooling helps prevent cracking. After the hour, carefully remove the cheesecake from the water bath and let it cool completely on a wire rack. Once at room temperature, cover the pan with plastic wrap and refrigerate for at least 6 hours, or preferably overnight, to allow it to set fully and the flavors to meld. Before serving, carefully run a knife around the edge of the pan and release the springform side. Garnish with fresh berries or a dollop of whipped cream if desired.
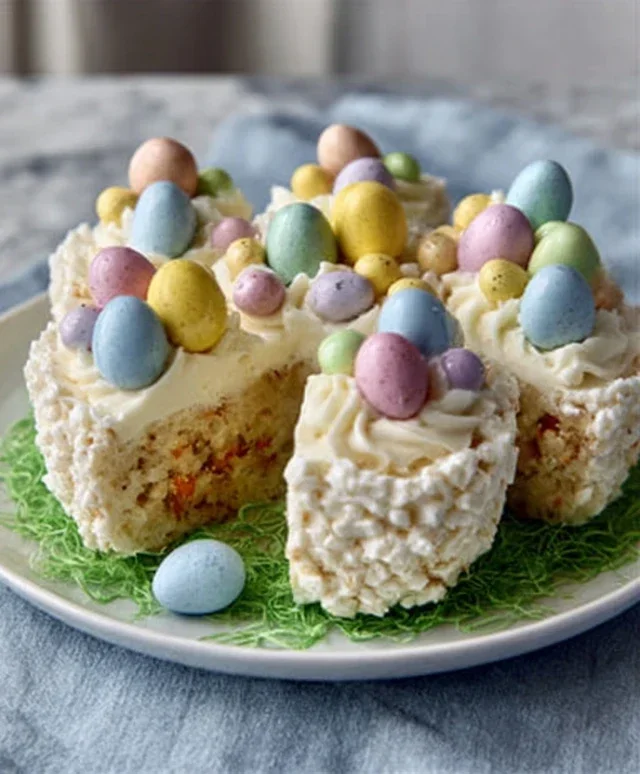
Easter Garden Cake
This Easter Garden Cake is a whimsical and delightful centerpiece that will captivate both kids and adults. It’s a simple cake, often a vanilla or yellow cake, transformed into a miniature edible garden with colorful frosting, candies, and maybe even some edible flowers. The magic is in the decoration, making it a fun activity for the whole family to get involved with.
Ingredients:
1 box yellow cake mix
Ingredients for cake mix (usually eggs, oil, water)
1 can (16 oz) vanilla frosting
Green food coloring
Assorted pastel-colored candies (jelly beans, M&Ms, mini eggs)
Optional: edible flowers, chocolate sprinkles
Cooking Instructions:
Bake the Cake: Prepare the yellow cake mix according to the package directions. Pour the batter into two 8-inch round cake pans that have been greased and floured. Bake according to package instructions until a toothpick inserted into the center comes out clean. Let the cakes cool in the pans for 10 minutes before inverting them onto a wire rack to cool completely. Make sure the cakes are fully cooled before frosting; a warm cake will melt the frosting.
Color the Frosting: While the cakes are cooling, divide the vanilla frosting into two bowls. Leave one bowl plain for the “soil” or a base layer if you prefer. In the other bowl, add green food coloring gradually, mixing thoroughly until you achieve a vibrant grassy green color. This is where the garden theme really starts to come to life.
Assemble the Garden Base: Once the cakes are completely cool, place one cake layer on your serving platter. If you’re making a layered cake, you can spread a thin layer of frosting (either plain or green) on top of this first layer before placing the second cake layer on top. Then, generously frost the entire cake, including the sides, with the green frosting. Use an offset spatula to create texture, mimicking blades of grass. You can even dab the spatula to create a more natural look.
Plant the “Flowers” and “Vegetables”: Now for the fun part! Arrange your assorted pastel-colored candies on top of the frosted cake to represent Easter eggs, flowers, and other garden elements. Jelly beans can be laid out like rows of tulips or daffodils, M&Ms can form colorful patches, and mini chocolate eggs can be scattered like hidden treasures. Get creative with your arrangements!
Add Finishing Touches: If you have edible flowers, gently press them into the frosting for an extra touch of realism. Chocolate sprinkles can be used to create pathways or to add detail around the base of your candy “plants.” You can even use a green piping bag with a grass tip to add more textured grass around the edges of the cake for a fuller garden effect. Let your imagin extractation bloom!
Funfetti Cake Mix Cookies
These Funfetti Cake Mix Cookies are a no-fuss, crowd-pleasing cookie that’s bursting with color and fun. They’re incredibly easy to make, requiring minimal ingredients and effort, making them perfect for a quick bake or for involving kids in the kitchen. The result is a soft, chewy cookie with a delightful confetti explosion in every bite.
Ingredients:
1 (15.25 ounce) box Funfetti cake mix
1/2 cup vegetable oil
2 large eggs
1 teaspoon vanilla extract
Optional: colorful sprinkles for extra pizzazz
Cooking Instructions:
Preheat and Prep: Preheat your oven to 375°F (190°C). Line baking sheets with parchment paper or silicone baking mats. This prevents the cookies from sticking and makes for easy cleanup.
Mix the Dough: In a large bowl, combine the Funfetti cake mix, vegetable oil, and large eggs. Stir with a wooden spoon or spatula until the ingredients are just combined and a thick dough forms. If the dough seems too dry or crum extractbly, you can add an extra tablespoon of vegetable oil.
Add Flavor and Fun: Stir in the vanilla extract for an extra layer of flavor. If you like extra sparkle, this is the time to add in additional colorful sprinkles to the dough itself. Mix gently until they are evenly distributed throughout.
Form the Cookies: Drop rounded tablespoons of dough onto the prepared baking sheets, spacing them about 2 inches apart. The cookies will spread as they bake, so giving them space is important to prevent them from running into each other. You can gently flatten the tops of the cookie dough balls with the palm of your hand or the bottom of a glass if you prefer flatter cookies.
Bake and Cool: Bake for 8-10 minutes, or until the edges are lightly golden brown and the centers are still slightly soft. The cookies will continue to cook slightly on the baking sheet after you remove them from the oven. Let the cookies cool on the baking sheets for 5 minutes before transferring them to a wire rack to cool completely. Enjoy these cheerful cookies!
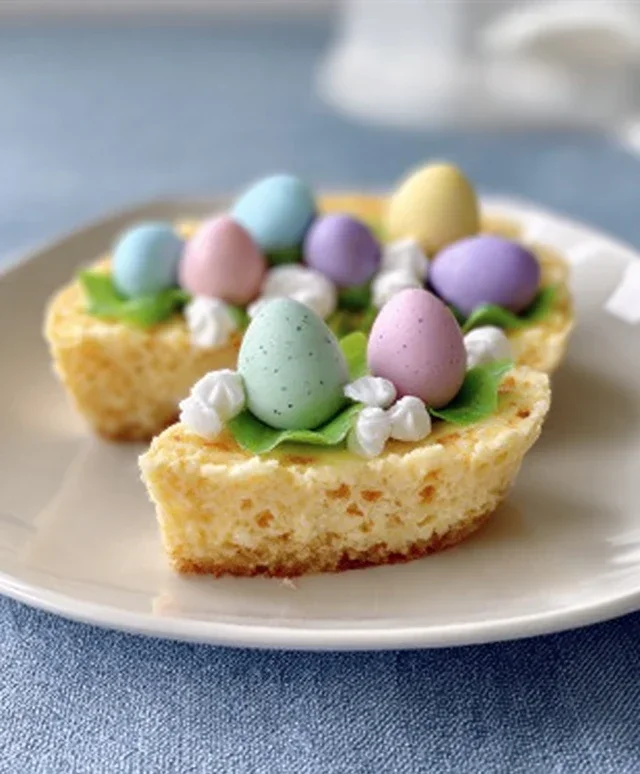
Coconut Macaroon Nests
These adorable Coconut Macaroon Nests are a delightful and relatively healthy Easter treat. They’re light, airy, and have a wonderful coconut flavor. The “nest” shape makes them perfect for filling with mini chocolate eggs, creating a charming edible display that’s both beautiful and delicious.
Ingredients:
3 cups shredded sweetened coconut
1/2 cup granulated sugar
1/4 teaspoon salt
2 large egg whites, lightly beaten
1 teaspoon vanilla extract
Mini chocolate eggs or other small candies for filling
Cooking Instructions:
Preheat and Prep: Preheat your oven to 325°F (160°C). Line a baking sheet with parchment paper.
Combine Dry Ingredients: In a medium bowl, combine the shredded coconut, granulated sugar, and salt. Stir well to ensure the sugar and salt are evenly distributed throughout the coconut.
Add Wet Ingredients: Pour in the lightly beaten egg whites and vanilla extract. Mix everything together until the coconut mixture is well-moistened and holds together when squeezed. The mixture should be sticky but pliable.
Form the Nests: Spoon mounds of the coconut mixture onto the prepared baking sheet, about 2 inches apart. Use your fingers or a small spoon to create a well or indentation in the center of each mound, forming a nest shape. This well will hold your “eggs.” Be careful not to make the sides too thin, as they might break.
Bake the Nests: Bake for 15-20 minutes, or until the edges of the macaroons are golden brown and the centers are set. Keep a close eye on them, as coconut can go from golden to burnt very quickly. Once baked, let the nests cool on the baking sheet for a few minutes before carefully transferring them to a wire rack to cool completely. Once cooled, fill the indentations with mini chocolate eggs or your chosen candies.
Carrot Strawberries
These Carrot Strawberries are a playful and healthy way to enjoy a spring treat. They’re incredibly simple, requiring just a few ingredients and no baking. They look charming and are a fantastic option for a lighter dessert or a fun snack for kids.
Ingredients:
1 pound fresh strawberries, washed and hulled
1 (8 ounce) package cream cheese, softened
1/4 cup powdered sugar
1/2 teaspoon vanilla extract
Green decorating icing or edible leaves (optional, for “tops”)
Cooking Instructions:
Prepare the Strawberries: Wash and thoroughly dry your fresh strawberries. It’s essential that they are completely dry so the cream cheese mixture adheres properly. Remove the green tops (hulls).
Make the Cream Cheese Filling: In a medium bowl, beat the softened cream cheese with an electric mixer until smooth and creamy. Gradually add the powdered sugar and vanilla extract, beating until well combined and fluffy. This creates a sweet and tangy “frosting” for our strawberries.
“Decorate” the Strawberries: Using a piping bag fitted with a round tip (or even just a Ziploc bag with the corner snipped off), pipe the cream cheese mixture onto the pointed end of each strawberry, resembling the orange part of a carrot. You can also use a small spatula to spread the cream cheese if you don’t have piping equipment. Aim for a smooth, conical shape.
Add the “Tops”: If using, carefully apply a small amount of green decorating icing to the top of where the strawberry’s hull was, or attach small edible leaves to resemble carrot greens. This step truly brings the “carrot” illusion to life.
Chill and Serve: Arrange the carrot strawberries on a platter. For the best texture and to allow the cream cheese to set slightly, chill them in the refrigerator for at least 30 minutes before serving. These are best enjoyed the same day they are made for optimal freshness and appearance.
This is just a taste of the amazing Easter desserts we have in store! We’ve got so many more creative and delicious ideas to share, ensuring your Easter celebration is filled with sweet memories and delightful flavors for everyone.
Conclusion:
I hope you’ve enjoyed exploring these 17 Easy Easter Dessert Recipes! From adorable bunny-shaped cookies that will delight the little ones to decadent cakes perfect for sharing with a crowd, there’s something here to make your Easter celebration extra sweet. These recipes are designed for simplicity and deliciousness, ensuring you can spend less time stressing in the kitchen and more time enjoying precious moments with your loved ones. Don’t be afraid to get creative! Many of these ideas lend themselves beautifully to variations. Swap out chocolate chips for sprinkles, add a swirl of your favorite colored frosting, or even incorporate seasonal fruits for a fresh twist. I truly encourage you to try out a few of these recipes – the joy of baking and the smiles on your guests’ faces will be incredibly rewarding. Let’s make this Easter unforgettable with these delightful treats!
Frequently Asked Questions:
Can I make these desserts ahead of time?
Absolutely! Many of these Easter desserts, like cookies, brownies, and no-bake cheesecakes, can be prepared a day or two in advance and stored properly. This is a fantastic way to reduce stress on Easter morning. For decorated items, consider decorating closer to the event to maintain freshness and prevent colors from bleeding.
What if I have dietary restrictions?
Great question! While not all recipes are inherently adaptable, many can be modified. For gluten-free options, you can often substitute gluten-free flour blends. For dairy-free, coconut milk or almond milk can often replace cow’s milk, and dairy-free butter substitutes work well. Look for recipes that naturally lend themselves to these adjustments or explore simple ingredient swaps.
How can I involve kids in making these desserts?
This is where the real fun begin extracts! Younger children can help with simple tasks like stirring ingredients, adding sprinkles, or pressing cookie cutters. Older kids can take on more complex steps like measuring, creaming butter and sugar, or even frosting. Decorating is always a hit with kids – let them go wild with edible markers, sprinkles, and candy! These 17 Easy Easter Dessert Recipes are perfect for creating lasting family memories in the kitchen.
Ingredients
-
Cream cheese
-
Sugar
-
Eggs
-
Vanilla extract
-
Graham cracker crumbs
-
Lemon zest
-
Coconut flakes
-
Cake mix
-
Sprinkles
-
Strawberries
-
Carrots
Instructions
-
Step 1
Prepare the base for a lemon cheesecake by pressing graham cracker crumbs into a pie dish.
-
Step 2
Mix softened cream cheese with sugar until smooth, then incorporate eggs one at a time.
-
Step 3
Stir in vanilla extract and lemon zest for a bright flavor.
-
Step 4
Pour the cheesecake filling over the prepared crust and bake until set.
-
Step 5
For coconut macaroon nests, combine shredded coconut with a binder and bake into small nest shapes.
-
Step 6
Create funfetti cake mix cookies by following the cake mix box instructions, adding sprinkles before baking.
-
Step 7
Decorate an Easter Garden Cake with green frosting to resemble grass and edible flowers or candy for a beautiful centerpiece.
-
Step 8
Transform strawberries into carrot shapes by cutting a small triangular notch and adding a green stem for a whimsical touch.
Important Information
Nutrition Facts (Per Serving)
It is important to consider this information as approximate and not to use it as definitive health advice.
Allergy Information
Please check ingredients for potential allergens and consult a health professional if in doubt.