Red White Blue Dirt Cups- Easy Patriotic Treat
Red, White and Blue Dirt Cups are more than just a dessert; they’re a delightful journey back to childhood, a guaranteed crowd-pleaser, and a vibrant celebration on a spoon! These iconic treats, with their playful layers of chocolate pudding, crushed cookies, and creamy toppings, have a magical way of bringin extractg smiles to faces of all ages. What is it about these simple Red, White and Blue Dirt Cups that makes them so universally loved? Perhaps it’s the nostalgic crunch of the “dirt,” the smooth sweetness of the pudding, or the sheer fun of diggin extractg in with a spoon. But when we add the patriotic flair of red and blue berries or candies, these Red, White and Blue Dirt Cups transform into something truly special – perfect for summer picnics, backyard barbecues, or any occasion that calls for a burst of festive cheer. Get ready to whip up a batch and watch the delight unfold!
Red, White and Blue Dirt Cups
Get ready to create a truly festive and fun dessert that’s perfect for any patriotic celebration, from the Fourth of July to Memorial Day or even a fun summer birthday party! These Red, White, and Blue Dirt Cups are a delightful twist on a classic favorite, bringin extractg together the irresistible combination of creamy pudding, crunchy cookie crum extractbs, and sweet gummy worms. They’re incredibly easy to assemble, making them a fantastic activity for kids and adults alike. The visual appeal is undeniable, with layers of red, white, and blue mimicking a colorful landscape, topped off with those wiggly, gummy inhabitants. This recipe is designed for simplicity, ensuring you can whip up a crowd-pleasing treat without any fuss. Let’s dive into the delicious details!
Ingredients:
Crafting Your Festive Pudding Layers
The first step in creating these show-stopping Red, White, and Blue Dirt Cups is preparing the pudding. We’ll be making two separate batches of cheesecake pudding, one for our vibrant red layer and one for our cool blue layer. This ensures distinct and eye-catching colors that will make our dirt cups truly pop.
1. Prepare the Base Pudding: In a large bowl, whisk together the contents of both boxes of cheesecake pudding mix with the 4 cups of milk. It’s crucial to whisk vigorously for at least two minutes. This thorough whisking helps to incorporate air and dissolve the pudding powder completely, ensuring a smooth and lump-free texture. As you whisk, you’ll notice the mixture begin extractning to thicken. For the best results and a perfectly set pudding, cover the bowl with plastic wrap, pressing the wrap directly onto the surface of the pudding. This prevents a skin from forming. Refrigerate for at least 5 minutes, or until the pudding is firm enough to hold its shape.
2. Divide and Conquer the Colors: Once your base pudding is chilled and slightly set, it’s time to divide it. Carefully spoon approximately half of the pudding into a separate medium-sized bowl. This will be the base for our red layer. The remaining pudding in the origin extractal bowl will be used for our blue layer.
3. Infuse the Red Hue: To the bowl containing half of the pudding, add ¼ teaspoon of red gel food dye. Gel food coloring is highly concentrated, so a little goes a long way. Start with the recommended amount and then gradually add more, a drop at a time, until you achieve your desired vibrant red color. Gently fold the food dye into the pudding using a spatula or spoon. Be patient and try to distribute the color evenly without overmixing, which can affect the pudding’s texture. Once the color is uniform, cover this bowl and refrigerate.
4. Infuse the Blue Hue: Now, take the remaining pudding in the origin extractal bowl and add ¼ teaspoon of blue gel food dye. Similar to the red pudding, fold in the blue dye gradually until you achieve a beautiful, even blue shade. Again, avoid overmixing. Cover this bowl and refrigerate it alongside the red pudding. It’s important to keep both colored puddings chilled while you prepare the “dirt.”
Preparing the “Dirt” and Assembling Your Cups
With our vibrant pudding layers chilling, it’s time to create the essential “dirt” element that gives these cups their name. The crushed Oreos are key to achieving that authentic, crum extractbly look of soil.
5. Crush the Oreos: Take your 19 Oreo cookies and place them into a resealable plastic bag or a food processor. If using a plastic bag, seal it tightly and then use a rolling pin or a heavy object to crush the cookies into fine crum extractbs. You want them to resemble dirt, so aim for a mix of fine powder and slightly larger crum extractbs for texture. If using a food processor, pulse the cookies until you reach your desired crum extractb consistency. Set the crushed Oreos aside.
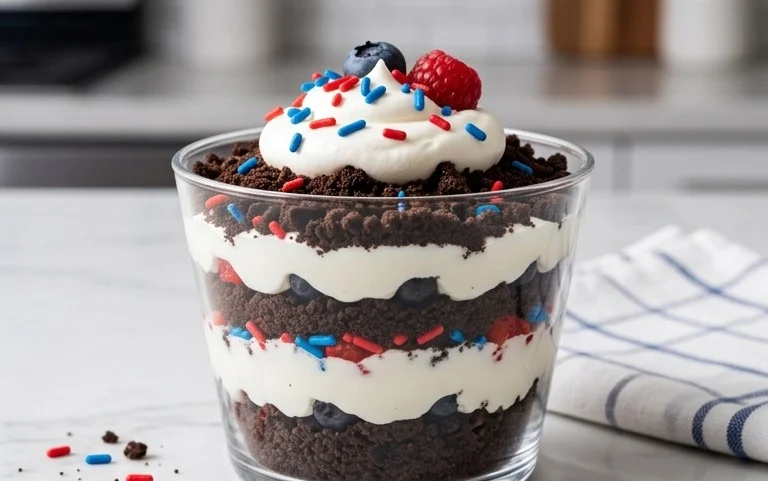
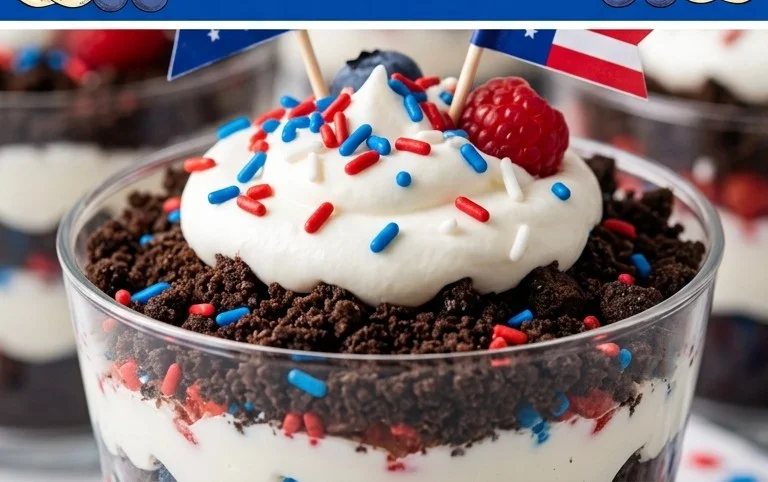
6. Assemble Your Dirt Cups: Now for the fun part – layering! Grab your serving cups or glasses. Begin extract by placing a layer of crushed Oreo “dirt” at the bottom of each cup. Don’t be shy; a good half-inch layer will create a nice base. Next, carefully spoon a layer of your chilled red pudding on top of the Oreo crum extractbs. Try to create a smooth surface for the next layer. Follow this with another layer of Oreo “dirt.” Then, spoon in a layer of your chilled blue pudding. Finish with a final, generous layer of Oreo “dirt” on top, making sure to cover the blue pudding completely. This creates the signature “dirt” effect.
7. Add the Gummy Worms: To bring your dirt cups to life, gently insert 2 red and blue gummy worms into the top layer of “dirt” in each cup. You can position them so they look like they are crawling out of the soil. This is where your creativity can shine! You can even add a third gummy worm if you like, or arrange them in different poses.
Allow your Red, White, and Blue Dirt Cups to chill in the refrigerator for at least 15-30 minutes before serving. This allows the flavors to meld and the pudding to set up even further. These delightful treats are sure to be a hit, bringin extractg smiles and patriotic cheer to any occasion! Enjoy every delicious, creamy, and crunchy bite!
Conclusion:
And there you have it! Our Red, White and Blue Dirt Cups are a delightful and incredibly easy dessert that’s perfect for any patriotic celebration or simply when you’re craving a fun, no-bake treat. The magic of this recipe lies in its simplicity – combining creamy pudding with crunchy cookie crum extractbs and sweet, fresh fruit creates a flavor and texture combination that’s universally loved. It’s the ultimate crowd-pleaser, especially for little hands who love to assemble their own! We’ve found these are always a huge hit at Fourth of July picnics, Memorial Day BBQs, or even just a fun summer afternoon. They look festive, taste delicious, and are so customizable. Don’t hesitate to get creative with your toppings – think sprinkles, edible glitter, or even a dollop of whipped cream for extra decadence. I truly encourage you to give these Red, White and Blue Dirt Cups a try; they’re guaranteed to bring smiles and a taste of pure joy!
Frequently Asked Questions:
Can I make these ahead of time?
Absolutely! These dirt cups are perfect for making ahead. You can prepare them a day in advance and store them covered in the refrigerator. Just be aware that the cookie crum extractbs might soften slightly overnight, which some people actually prefer! If you want to maintain maximum crunch, you can add the final layer of cookie crum extractbs just before serving.
What other fruits can I use for the red and blue layers?
While strawberries and blueberries are classic for a reason, feel free to experiment! Raspberries are a fantastic substitute for strawberries, offering a slightly tarter but equally delicious red layer. For blue, blackberries are a wonderful alternative or addition to blueberries. If you’re feeling adventurous, even some sliced red grapes or cherries could add a unique touch to the red layer.
Can I use a different type of pudding?
Certainly! While chocolate pudding is traditional for the “dirt” layer, you can absolutely switch it up. Vanilla or even cheesecake flavored pudding would work beautifully. If you use a lighter colored pudding, you might want to add a few more cookie crum extractbs on top to maintain that classic dirt cup aesthetic!
Red, White and Blue Dirt Cups
A festive and easy dessert featuring creamy pudding, crushed Oreos, and colorful gummy worms, perfect for patriotic celebrations.
Ingredients
-
2 boxes cheesecake pudding (3.4 ounces each)
-
4 cups milk
-
19 Oreo cookies (crushed)
-
1/4 teaspoon red gel food dye
-
1/4 teaspoon blue gel food dye
-
8 red and blue gummy worms
Instructions
-
Step 1
In a large bowl, whisk together the cheesecake pudding mix and milk until well combined and smooth. -
Step 2
Divide the pudding into three equal portions in separate bowls. -
Step 3
Add red gel food coloring to one bowl and stir until evenly colored. Add blue gel food coloring to another bowl and stir until evenly colored. Leave the third bowl plain white. -
Step 4
In the bottom of 8 small cups or jars, add a layer of crushed Oreo cookies. -
Step 5
Carefully layer the red pudding, then the white pudding, and finally the blue pudding over the crushed Oreos in each cup. You can swirl them slightly for a marbled effect. -
Step 6
Top each dirt cup with a few more crushed Oreo cookies to resemble dirt. -
Step 7
Garnish each cup with a red and blue gummy worm sticking out. -
Step 8
Chill in the refrigerator for at least 10 minutes before serving.
Important Information
Nutrition Facts (Per Serving)
It is important to consider this information as approximate and not to use it as definitive health advice.
Allergy Information
Please check ingredients for potential allergens and consult a health professional if in doubt.