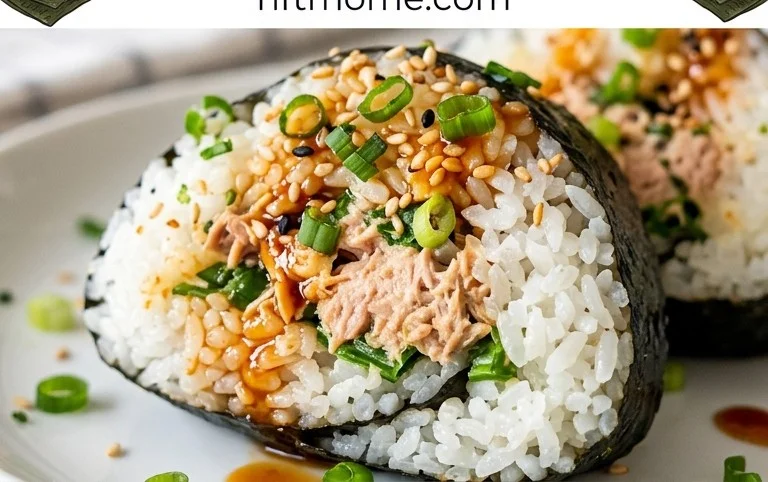
Easy Japanese Tuna Onigiri – Quick & Delicious
15-min. Easy Japanese Tuna Onigiri are a true lifesaver for busy days! If you’ve ever found yourself staring into the fridge at lunchtime with absolutely no inspiration, or craving a quick, satisfying snack that doesn’t involve a lengthy cooking process, then you’ve come to the right place. These delightful rice balls are incredibly popular for a reason: they’re packed with flavor, wonderfully portable, and surprisingly filling. What makes Japanese Tuna Onigiri so special is the perfect harmony of fluffy rice, savory seasoned tuna, and that iconic triangular shape, often wrapped in a crisp sheet of nori. They’re a taste of home for many and a delicious adventure for newcomers, proving that a little bit of effort can yield a whole lot of deliciousness in under 15 minutes. Get ready to master this fantastic recipe!

15-Minute Easy Japanese Tuna Onigiri
Craving a quick, satisfying, and authentically Japanese snack or light meal? Look no further than these 15-minute easy Japanese tuna onigiri! Onigiri, or rice balls, are a beloved staple in Japan, often enjoyed for lunch, picnics, or as a convenient portable snack. This recipe focuses on a classic and incredibly delicious filling: savory tuna mixed with creamy Japanese mayonnaise. The beauty of onigiri lies in its simplicity, and with a few key ingredients and a little practice, you’ll be whipping these up in no time. They are perfect for busy weekdays when you need something nourishing without a lot of fuss, or as a fun and interactive cooking project with family or friends. The slightly sticky, perfectly seasoned rice combined with the flavorful tuna filling is a match made in culinary heaven. Let’s get started!
Ingredients:
Preparing the Filling
The heart of our onigiri is this simple yet incredibly flavorful tuna filling. It’s important to drain your canned tuna very well, whether you’re using tuna packed in oil or water. Excess liquid can make the rice soggy and difficult to mold. If using tuna in oil, you can lightly press the tuna against the side of the can with a fork to remove most of the oil. For tuna in water, a thorough draining is usually sufficient. In a small bowl, combine the drained tuna with the Japanese mayonnaise. Japanese mayonnaise, like Kewpie, has a richer, creamier texture and a slightly tangier flavor due to the use of egg yolks and rice vinegar, which complements the tuna beautifully. If you don’t have Japanese mayonnaise, regular mayonnaise will still work, but you might find the flavor profile to be slightly different. Mix the tuna and mayonnaise together until it forms a cohesive, spreadable mixture. You can also add a pinch of salt and pepper to the filling if you like, but the mayonnaise and tuna are often flavorful enough on their own. Taste and adjust seasoning as needed.
Getting the Rice Ready
The type of rice you use is crucial for onigiri. Short-grain Japanese rice is ideal because of its stickiness, which allows the rice balls to hold their shape. If you’re using freshly cooked rice, ensure it’s still warm but not piping hot. You want it to be manageable to the touch. If you’re using leftover rice, you’ll want to gently warm it up. You can do this in the microwave or by steaming it. The key is to have the rice slightly warm so it’s pliable. Once your rice is ready, transfer it to a large bowl. Sprinkle the 1/2 teaspoon of salt evenly over the warm rice. This salt will season the rice from the inside out, ensuring each bite is perfectly balanced. Using your hands (lightly dampened with water to prevent sticking) or a rice paddle, gently mix the salt into the rice. Be careful not to mash the rice grains; you want to preserve their texture. The goal is to distribute the salt evenly throughout the rice.
Forming the Onigiri
This is where the magic happens! Dampen your hands with water. This is an essential step that prevents the sticky rice from clingin extractg to your fingers. You can keep a small bowl of water nearby to re-dampen your hands as needed. Take about half a cup of the seasoned warm rice into your palm. Create a slight indentation in the center of the rice. This will be where you place your tuna filling. Spoon about a tablespoon of the tuna mayonnaise mixture into the indentation. Now, gently bring the edges of the rice up and around the filling, encasing it completely. Begin extract to shape the rice ball by gently pressing and rotating it between your palms. The pressure should be firm enough to hold the shape but not so hard that you crush the rice grains. Aim for a classic triangular or round shape. If the rice starts to stick, just re-dampen your hands. Don’t worry if your first few onigiri aren’t perfectly shaped; they’ll still taste delicious! Practice makes perfect with this step.
Wrapping and Garnishing
Once you have your rice balls formed, it’s time to add the finishing touch: the nori. Cut your nori sheets into manageable strips. For triangular onigiri, a strip about 2 inches wide and 3-4 inches long is usually a good size to wrap around the base of the triangle. For round onigiri, you can use smaller pieces to wrap around the sides. Lightly dampen the nori with a tiny bit of water or even a little rice vinegar to make it pliable and help it stick to the rice. Place the nori strip onto the onigiri, pressing it gently to adhere. If you’re adding sesame seeds, you can sprinkle them over the onigiri before or after wrapping with nori, or even press them gently into the rice before wrapping. The sesame seeds add a lovely nutty flavor and a decorative touch.
Tips for Success and Variations
Enjoy your homemade 15-minute easy Japanese tuna onigiri! They are a simple yet satisfying way to bring a taste of Japan to your table.
Conclusion:
And there you have it! Our 15-min. Easy Japanese Tuna Onigiri is a fantastic testament to how delicious and satisfying simple ingredients can be. This recipe is perfect for busy weeknights, quick lunches, or even as a delightful snack. Its beauty lies in its speed and adaptability, offering a taste of Japan without requiring hours in the kitchen. The combination of fluffy rice, savory tuna, and the subtle crunch of nori is incredibly rewarding, making it a go-to for many. Don’t hesitate to get creative with your fillings and seasonings to make these tuna onigiri your own!
These versatile treats are wonderful on their own, packed in a bento box, or served alongside a light miso soup for a complete meal. For variations, consider adding a touch of kewpie mayonnaise for extra creaminess, a sprinkle of furikake for added flavor, or even some finely chopped scallions for a fresh bite. The possibilities are endless, and experimenting is part of the fun!
I truly encourage you to give this Japanese Tuna Onigiri recipe a try. It’s incredibly forgiving and delivers fantastic results every time. Enjoy crafting these little flavor bombs!
Frequently Asked Questions:
Can I use different types of canned fish?
Absolutely! While tuna is classic, you can experiment with other canned fish like salmon or mackerel. Just drain them well and adjust seasonings to your liking.
What if I don’t have nori seaweed?
No worries! You can still make delicious onigiri without nori. The shape and rice will be just as enjoyable. You can also serve them with a side of soy sauce for dipping.
15-min. Easy Japanese Tuna Onigiri
Quick and delicious Japanese rice balls filled with seasoned tuna and mayonnaise, wrapped in nori seaweed. Perfect for a speedy snack or light meal.
Ingredients
-
2 cups cooked short grain rice
-
1/2 tsp salt
-
5.29 oz canned tuna (in oil recommended, or canned tuna in water)
-
2 tbsp Japanese mayo
-
2 sheets nori
-
1 tsp sesame seeds (for garnishing, optional)
Instructions
-
Step 1
In a bowl, gently mix the cooked short grain rice with salt. If the rice is very hot, let it cool slightly so you can handle it. -
Step 2
Drain the canned tuna very well. In a separate small bowl, flake the tuna and mix it with the Japanese mayonnaise. Stir until well combined. -
Step 3
Wet your hands with water and a pinch of salt to prevent the rice from sticking. Take about 1/2 cup of rice and shape it into a ball or triangle in your palm. -
Step 4
Make a small indentation in the center of the rice ball and add about 1-2 tablespoons of the tuna mayo mixture. Cover the filling with more rice and reshape it into your desired onigiri form. -
Step 5
Cut the nori sheets into strips. Wrap a strip of nori around the bottom or side of each onigiri. -
Step 6
If using, sprinkle with sesame seeds for extra flavor and texture.
Important Information
Nutrition Facts (Per Serving)
It is important to consider this information as approximate and not to use it as definitive health advice.
Allergy Information
Please check ingredients for potential allergens and consult a health professional if in doubt.