Chocolate Dipped Fruit Cones-Sweet Delight Recipe
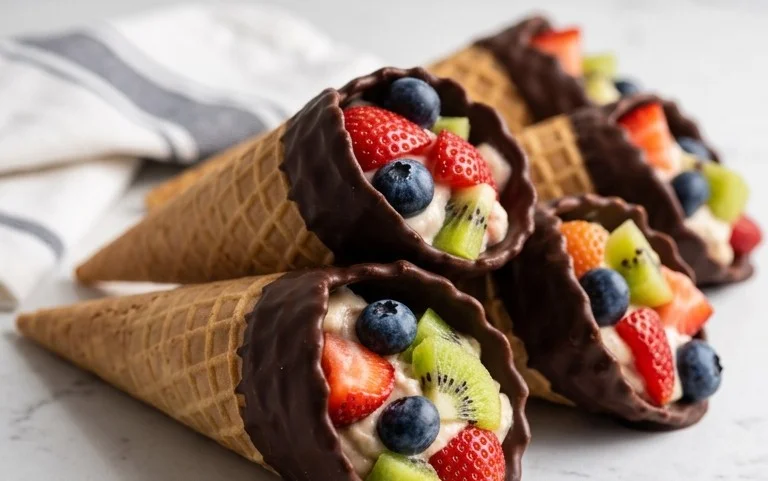
Chocolate Dipped Fruit Filled Cones are more than just a dessert; they’re a delightful burst of joy in every bite. Imagin extracte the crisp crunch of a perfectly baked cone, cradling a luscious, sweet filling, all enveloped in a decadent shell of smooth, rich chocolate. It’s a combination that speaks to pure indulgence, a treat that evokes childhood nostalgia while offering a sophisticated twist. We love these because they manage to be both incredibly satisfying and surprisingly refreshing. The interplay of textures – the crunchy cone, the soft fruit filling, the brittle chocolate – is simply divine. What truly sets our Chocolate Dipped Fruit Filled Cones apart is the customizable nature. Whether you’re a fan of tart berries, tropical mangoes, or creamy banana, the possibilities are endless, making each creation a personal masterpiece. Get ready to elevate your dessert game with these irresistible Chocolate Dipped Fruit Filled Cones!
Ingredients:
Instructions:
Preparing Your Cones
The first step in creating these delightful treats is to get your cones ready. I like to lay out a sheet of parchment paper or wax paper on a clean, flat surface. This is crucial because it will catch any excess chocolate and make cleanup a breeze. It also provides a stable surface for the dipped cones to harden without sticking. If you’re using sugar cones, they can be a bit more delicate, so handle them with care. Waffle cones offer a sturdier base, which can be helpful, especially if you’re planning on adding a good amount of filling. Ensure your cones are completely dry before you begin extract dipping; any moisture can interfere with the chocolate adhering properly.
Melting the Chocolate
Now, let’s get to the star of the show: the chocolate! I find the easiest and most reliable way to melt chocolate for dipping is using a double boiler method. This prevents the chocolate from burning. To do this, you’ll need a heatproof bowl that fits snugly over a saucepan filled with about an inch of water. Bring the water to a gentle simmer over medium-low heat. Place your chopped chocolate and the coconut oil or shortening into the bowl. Stir the chocolate gently and continuously with a spatula as it melts. The coconut oil or shortening is a secret weapon – it makes the chocolate smoother, shinier, and helps it set up with a nice snap. Be patient! Don’t rush the melting process. If the water is boiling too vigorously, the steam can get into the chocolate and cause it to seize, which is a baker’s nightmare. Once the chocolate is mostly melted, remove the bowl from the heat. Continue to stir until all the chocolate is smooth and glossy. The residual heat will finish the job.
Filling the Cones
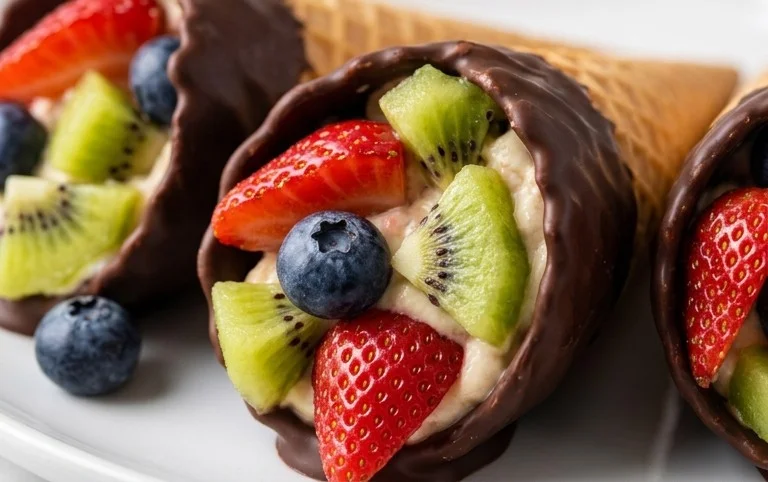
This is where the magic happens – filling your cones! Make sure your fresh fruits are washed and thoroughly dried. For berries, especially strawberries, it’s a good idea to gently pat them dry with a paper towel. If you’re using larger berries like strawberries, you might want to slice them in half or quarters, especially if they’re quite big, to make them easier to fit inside the cone and to create more surface area for the chocolate to adhere to. Chop any other fruits into small, bite-sized pieces. Aim for pieces that are no larger than what you’d find in a typical fruit salad. You want to be able to easily get a bit of fruit with each bite of chocolate and cone. Gently place your prepared fruit pieces into the cones. Don’t overfill them; you’ll want to leave a little bit of space at the top for the chocolate to seal in the fruit. Think of it like packing a suitcase – you want to fit as much as you can without bursting the seams!
Dipping and Decorating
With your cones filled, it’s time for the grand finnon-alcoholic ale: dipping them in chocolate! Hold a filled cone by the tip and carefully dip the open end into the melted chocolate. You want to coat about two-thirds of the cone with chocolate. Rotate the cone gently to ensure an even coating. Let any excess chocolate drip back into the bowl for a few seconds. This is important for getting that clean, beautiful finish. If you want a thicker coating, you can dip it again, but allow the first layer to set slightly before the second dip. This is also the time to get creative with your decorations! If you’re using sprinkles, chopped nuts, or shredded coconut, gently press them onto the wet chocolate immediately after dipping. This is a fun part for everyone, and you can really let your personality shine. If you’re going for a more minimalist look, you can skip the decorations altogether and let the shiny chocolate speak for itself.
Setting and Enjoying
Once your cones are dipped and decorated, carefully place them upright on the parchment-lined baking sheet. This is where patience comes in again! Let the chocolate set completely. You can speed this up by placing the baking sheet in the refrigerator for about 15-20 minutes, or in the freezer for about 10 minutes. However, I often find that letting them set at room temperature for about an hour or two yields the best texture and prevents condensation from forming on the chocolate. Once the chocolate is firm to the touch, your delicious chocolate-dipped, fruit-filled cones are ready to be devoured! Serve them immediately for the best experience, or store them in an airtight container at room temperature if they aren’t going to be eaten right away. I recommend enjoying them within a day or two for optimal freshness of the fruit and crispness of the cones. These make for a fantastic dessert for parties, a special treat on a warm afternoon, or simply a way to brighten your day!
Conclusion:
I hope you’ve enjoyed learning how to create these delightful Chocolate Dipped Fruit Filled Cones! They truly are a showstopper, offering a fantastic balance of creamy, fruity, and chocolatey flavors in every bite. Their whimsical presentation makes them perfect for celebrations, parties, or simply as a special treat to brighten your day. The crisp cone, the luscious fruit filling, and the rich chocolate coating combine to create a truly satisfying dessert experience. Whether you’re a seasoned baker or just starting out, this recipe is surprisingly accessible and incredibly rewarding. Don’t be afraid to get creative with your fruit choices and chocolate combinations – the possibilities are endless!
For serving, consider presenting these cones on a tiered stand for an elegant buffet, or individually wrapped for party favors. They pair wonderfully with a scoop of vanilla ice cream or a dollop of whipped cream. And the variations are where you can truly make these your own! Try a dark chocolate dip with raspberries, milk chocolate with strawberries and a hint of mint, or even white chocolate with mango and passionfruit. I highly encourage you to give these Chocolate Dipped Fruit Filled Cones a try. They are guaranteed to impress your friends and family, and more importantly, to bring a smile to your face!
Frequently Asked Questions:
Can I make these cones ahead of time?
Yes, absolutely! You can prepare the fruit filling and dip the cones in chocolate up to 24 hours in advance. Store them in an airtight container in the refrigerator. It’s best to add any extra garnishes, like sprinkles, just before serving to ensure they stay fresh and vibrant.
What kind of cones work best for this recipe?
Waffle cones are ideal because their sturdier texture holds up well to the filling and the chocolate coating. Sugar cones can also work, but they might be a bit more delicate. Avoid cake cones as they are too soft and may not provide enough structural support.
How should I store leftover cones?
If you happen to have any leftovers, store them in an airtight container in the refrigerator. They will stay fresh for a day or two, though the cone may lose some of its crispness over time. Enjoy them chilled!
Chocolate Dipped Fruit Filled Cones
A delightful dessert combining crunchy cones, fresh fruit, and rich chocolate for a sweet treat.
Ingredients
-
1 (10 ounce) package waffle cones
-
1 cup sliced strawberries
-
1 cup blueberries
-
1 cup raspberries
-
1 cup heavy whipping cream
-
1/4 cup powdered sugar
-
1/2 teaspoon vanilla extract
-
12 ounces semi-sweet chocolate chips
Instructions
-
Step 1
Prepare the whipped cream: In a chilled bowl, beat heavy whipping cream with an electric mixer until soft peaks form. Gradually add powdered sugar and vanilla extract, continuing to beat until stiff peaks form. -
Step 2
Melt the chocolate: Place semi-sweet chocolate chips in a microwave-safe bowl. Microwave in 30-second intervals, stirring between each, until smooth and fully melted. -
Step 3
Dip the cones: Hold each waffle cone by the tip and dip the open end into the melted chocolate, coating about half of the cone. Place the dipped cones, chocolate-side up, on a baking sheet lined with parchment paper. -
Step 4
Fill the cones: Spoon the prepared whipped cream into the dipped cones, filling them about halfway. -
Step 5
Add the fruit: Gently place a mixture of sliced strawberries, blueberries, and raspberries on top of the whipped cream in each cone. -
Step 6
Chill: Refrigerate the filled cones for at least 30 minutes to allow the chocolate to set and the flavors to meld.
Important Information
Nutrition Facts (Per Serving)
It is important to consider this information as approximate and not to use it as definitive health advice.
Allergy Information
Please check ingredients for potential allergens and consult a health professional if in doubt.