Easy 4th of July Snack Mix Recipe – Party Perfect
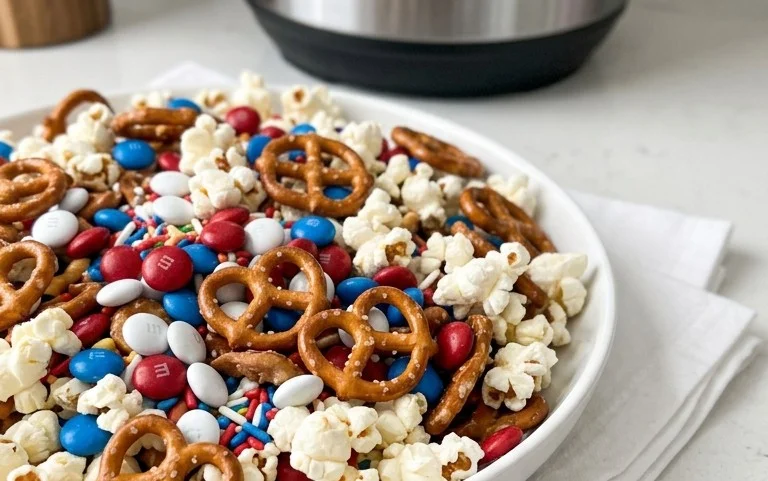
4th of July Snack Mix is an absolute must-have for any celebration of independence! As the summer sun blazes and fireworks prepare to light up the night sky, what better way to fuel our patriotic festivities than with a bowl of delicious, crowd-pleasing goodness? This isn’t just any snack; it’s a vibrant tapestry of textures and flavors that perfectly embodies the spirit of the holiday. Think salty, sweet, crunchy, and chewy all in one bite, making it impossible to resist. What makes this 4th of July Snack Mix so special is its incredible versatility and the sheer joy it brings to gatherings. It’s the perfect companion for backyard barbecues, picnics in the park, or even just a cozy night in watching the parade. We all love a good snack mix, and this one, with its festive flair, is guaranteed to be a star on your holiday table.
Fourth of July Snack Mix: A Patriotic Treat Everyone Will Love!
Get ready to celebrate the red, white, and blue with a snack that’s as fun to make as it is to eat! This Fourth of July Snack Mix is the perfect addition to any backyard barbecue, picnic, or fireworks viewing party. It’s incredibly easy to whip up, customizable to your taste, and guaranteed to disappear quickly. The combination of crunchy, sweet, and a hint of salty creates a flavor explosion that will have your guests asking for the recipe. Plus, with the festive colors, it’s a visual feast that perfectly complements the celebratory spirit of Independence Day. Forget the boring chips and dip; this snack mix is a showstopper!
Ingredients:
Getting Started: The Dry Mix Base
The foundation of this delicious snack mix is all about bringin extractg together a variety of crunchy, satisfying elements. In a very large mixing bowl, you’ll want to combine your cereals and pretzels. I recommend using a bowl that’s generously sized because once we add the melted chocolate, things can get a little crowded. Start with the 2 cups of Chex cereal – whether you choose corn or rice, or a combination of both, it adds a wonderfully light crispness. Next, toss in the 1 cup of mini pretzel twists. If you can only find pretzel rods, don’t worry, just break them into bite-sized pieces. The slight saltiness of the pretzels perfectly balances the sweetness that’s to come. Now, for the stars of the crunchy show: 2 cups of Cap’n Crunch cereal (make sure it’s the plain kind, as the berry version will add unwanted color and flavor to our white chocolate coating) and 2 cups of Honey Nut Cheerios. The Honey Nut Cheerios add a delightful sweetness and a hint of honey flavor that pairs beautifully with the white chocolate. Give everything a gentle stir to ensure the ingredients are evenly distributed. You want a good mix of all the dry components before we move on to the magical coating.
The White Chocolate Transformation
This is where the magic truly happens! We’re going to create a luscious white chocolate coating that will bind all our crunchy ingredients together and add a decadent sweetness. You have a couple of options for melting your white chocolate. The microwave method is quick and easy, but you need to be careful not to overheat the chocolate, which can cause it to seize. Place your 1-1/2 bags (which totals about 2-3/4 cups) of white chocolate chips into a microwave-safe bowl. Add the 1-1/2 teaspoons of coconut oil (or vegetable oil). The oil is crucial here; it helps the white chocolate melt smoothly and prevents it from becoming too thick. Microwave the chips in 30-second intervals, stirring thoroughly after each interval. Continue this process until the chocolate is almost completely melted, then stir until it’s smooth and glossy. Alternatively, you can use a double boiler. Fill the bottom pot of a double boiler with about an inch of water and bring it to a simmer. Place the white chocolate chips and oil in the top bowl, ensuring the bottom of the bowl doesn’t touch the water. Stir constantly until the chocolate is melted and smooth. Once your white chocolate is perfectly melted and smooth, it’s time to coat our dry ingredients.
Coating and Combining
Now, it’s time to marry the crunchy goodness with the sweet, creamy white chocolate. Gently pour the melted white chocolate over the cereal and pretzel mixture in your large bowl. Using a large spatula or a couple of spoons, carefully fold the chocolate into the dry ingredients. The key here is to be gentle. We don’t want to crush the cereals or pretzels. Continue to fold until every piece is lightly and evenly coated. This might take a few minutes, and you might have to scrape the sides and bottom of the bowl a few times to ensure nothing is left uncoated. The goal is a beautiful, shimmering mixture where each morsel has a kiss of white chocolate. Don’t worry if there are a few clumps; that’s part of the rustic charm of homemade snack mix! The coconut oil helps thin the chocolate just enough so it coats without being overly thick or gloopy.
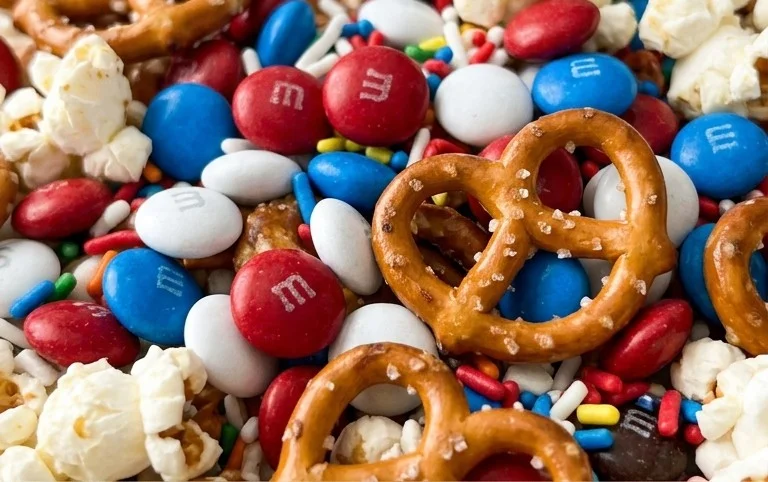
Adding the Patriotic Sparkle
This is arguably the most fun step – adding the pops of red, white, and blue! Once your dry ingredients are coated in the luscious white chocolate, it’s time to add the festive M&M’s. Gently fold in the 1 cup of red, white, and blue M&M’s. The vibrant colors instantly transform this into a quintessential Fourth of July treat. If you’re feeling extra festive and have them on hand, now is also the perfect time to add the 2 tablespoons of festive sprinkles. Stir them in gently; the sprinkles will stick to the still-warm white chocolate, adding an extra layer of sparkle and fun. If you’re using regular M&M’s and want to boost the patriotic colors, you can always add a few extra red and blue M&M’s after the initial mix. Just a word of caution: try to add these towards the end of the mixing process to prevent the colors from bleeding too much into the white chocolate.
Setting and Serving Your Masterpiece
The final step is allowing your beautiful creation to set. Line a couple of large baking sheets with parchment paper or wax paper. This is crucial to prevent the snack mix from sticking. Carefully spread the coated snack mix evenly onto the prepared baking sheets. You want to avoid a super thick layer, as this will help it set more quickly and evenly. If the mixture is clumping together too much, you can gently break it apart with your fingers while it’s still a little warm and pliable. Let the snack mix sit at room temperature for at least 1-2 hours, or until the white chocolate is completely hardened. For a quicker setting time, you can pop the baking sheets into the refrigerator for about 30-45 minutes. Once hardened, break apart any large clumps and store your delicious Fourth of July Snack Mix in an airtight container at room temperature. It will stay fresh for up to a week, making it perfect for making ahead of your celebration. Enjoy this delightful, festive, and incredibly addictive treat!
Conclusion:
I hope you’re as excited as I am about this 4th of July Snack Mix! This recipe is a real winner because it’s incredibly easy to make, customizable, and delivers a fantastic flavor explosion with every bite. The combination of salty, sweet, and savory elements makes it utterly irresistible. It’s the perfect fuss-free addition to any Independence Day celebration, whether you’re hosting a backyard barbecue, heading to a picnic, or enjoying fireworks with friends. Serve it in festive bowls, individual snack bags, or even as a delightful topping for a patriotic dessert. Don’t be afraid to get creative with your variations; this mix is a playground for your taste buds!
Seriously, give this 4th of July Snack Mix a try! It’s guaranteed to be a crowd-pleaser and will disappear faster than you can say “red, white, and blue.” Happy snacking and Happy 4th of July!
Frequently Asked Questions:
Can I make this snack mix ahead of time?
Absolutely! This 4th of July Snack Mix is perfect for making a day or two in advance. Store it in an airtight container at room temperature to maintain its freshness and crunch. This makes party prep so much easier!
What are some other ingredient ideas for variations?
The possibilities are endless! You could add some spicy elements like chili powder or cayenne pepper, some extra crunch with seasoned croutons or tortilla chips, or even some fruitiness with dried cranberries or blueberries. For a decadent touch, drizzle with melted white chocolate or caramel.
How should I store any leftovers?
Leftovers can be stored in an airtight container at room temperature for up to a week. However, I doubt you’ll have many leftovers – it’s that good!
4th of July Snack Mix
A festive and easy-to-make sweet and salty snack mix perfect for any patriotic celebration.
Ingredients
-
2 cups Chex cereal (corn or rice)
-
1 cup mini pretzel twists
-
2 cups Cap’n Crunch cereal
-
2 cups Honey Nut Cheerios cereal
-
1 cup red, white, and blue M&M’s
-
1-1/2 bags (16 ounces total) white chocolate chips
-
1-1/2 teaspoons coconut oil
-
2 tablespoons festive sprinkles
Instructions
-
Step 1
Line a large baking sheet with parchment paper or wax paper. -
Step 2
In a very large bowl, combine the Chex cereal, mini pretzel twists, Cap’n Crunch cereal, and Honey Nut Cheerios cereal. Stir gently to combine. -
Step 3
In a microwave-safe bowl, combine the white chocolate chips and coconut oil. Microwave in 30-second intervals, stirring after each, until melted and smooth. -
Step 4
Pour the melted white chocolate over the dry ingredients in the large bowl. Stir gently until everything is evenly coated. Be careful not to break the cereal too much. -
Step 5
Spread the coated mixture in a single layer on the prepared baking sheet. -
Step 6
Immediately sprinkle the red, white, and blue M&M’s and festive sprinkles evenly over the top while the chocolate is still wet. This helps them stick. -
Step 7
Let the snack mix sit at room temperature until the white chocolate has hardened, about 15-20 minutes. You can speed this up by placing it in the refrigerator for a few minutes. -
Step 8
Break apart any large clumps and store in an airtight container at room temperature.
Important Information
Nutrition Facts (Per Serving)
It is important to consider this information as approximate and not to use it as definitive health advice.
Allergy Information
Please check ingredients for potential allergens and consult a health professional if in doubt.