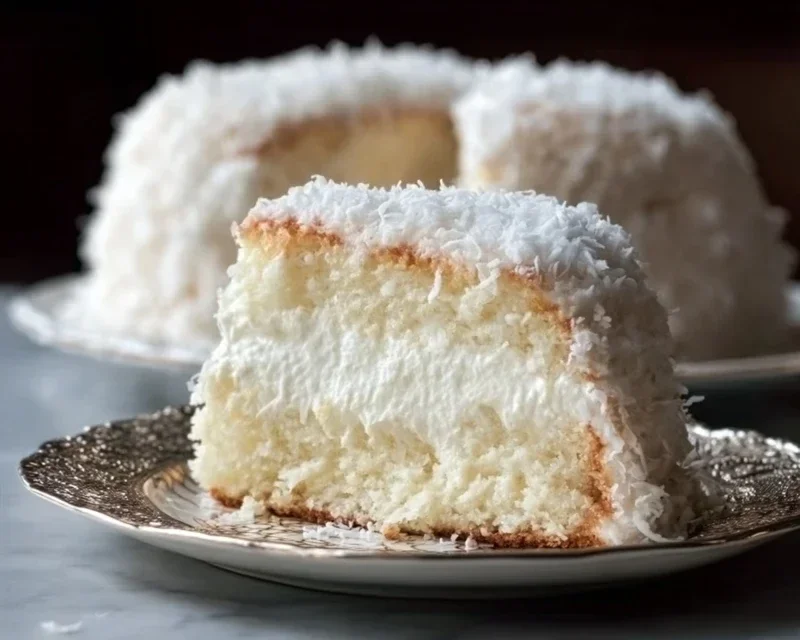
Coconut Cloud Cake Recipe – Light & Airy Treat
Coconut Cloud Cake Recipe: Prepare to be swept away on a culinary journey with this ethereal Coconut Cloud Cake Recipe. If you’ve ever dreamt of tasting a bite of pure, unadulterated bliss, this is it. We all crave those desserts that feel light, airy, and utterly decadent, and this cake delivers on all fronts. What makes this particular Coconut Cloud Cake Recipe so beloved is its incredible texture – it’s like sinking your fork into a fluffy, sweet cloud. The subtle yet unmistakable sweetness of coconut weaves its way through every moist crum extractb, creating a flavor profile that is both comforting and sophisticated. It’s the perfect centerpiece for any celebration, or simply a delightful indulgence to brighten your everyday. Get ready to experience cake perfection!
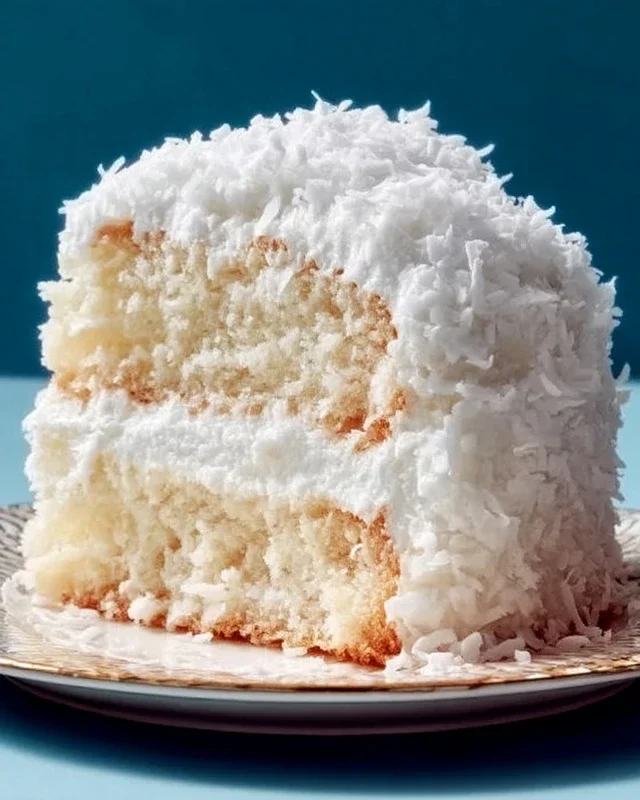
The Ultimate Coconut Cloud Cake Recipe
There’s something truly magical about a cake that feels as light and airy as a cloud, especially when infused with the tropical essence of coconut. My Coconut Cloud Cake is precisely that – a dreamy confection that will transport your taste buds to paradise with every bite. It’s perfect for celebrations, a special dessert, or simply when you’re craving a little slice of heaven. The combination of tender cake, luscious frosting, and that unmistakable coconut flavor is simply divine. This recipe is designed to be straightforward, yet yields an impressive and incredibly delicious result.
Ingredients:
Preparing Your Coconut Cloud Cake
Let’s get started on creating this cloud-like delight! The key to a light and fluffy cake is proper preparation and careful mixing.
The Cake Batter: Creating the Foundation
1. Preheat and Prepare Pans: Begin extract by preheating your oven to 350 degrees Fahrenheit (175 degrees Celsius). Grease and flour two 8-inch round cake pans. You can also line the bottoms with parchment paper for extra insurance against sticking. This step is crucial for ensuring your beautiful cake releases cleanly.
2. Combine Dry Ingredients: In a medium bowl, whisk together the all-purpose flour, baking powder, and salt. Whisking these together ensures they are evenly distributed throughout the batter, which helps with even leavening and texture. Set this aside.
3. Cream Butter and Sugar: In a large bowl, using an electric mixer, beat the softened unsalted butter and granulated sugar until the mixture is light and fluffy. This process, known as creaming, incorporates air into the butter and sugar, which is a fundamental step in creating a tender cake. Scrape down the sides of the bowl as needed. This typically takes about 3-5 minutes.
4. Add Eggs and Extracts: One at a time, beat in the large eggs, ensuring each egg is fully incorporated before adding the next. This gradual addition helps to emulsify the batter. Next, stir in the vanilla extract and coconut extract. The aroma alone is starting to smell like pure bliss!
5. Alternate Dry and Wet Ingredients: Now, we’ll gradually add the dry ingredients and the coconut milk to the butter mixture. Begin extract by adding about one-third of the dry ingredients and mix until just combined. Then, add half of the coconut milk and mix. Repeat this process, alternating between the dry ingredients and coconut milk, ending with the dry ingredients. Be careful not to overmix the batter once the flour is added. Overmixing can develop the gluten in the flour, leading to a tougher cake. Mix until just streaks of flour disappear. The batter should be smooth and creamy, with a lovely coconut scent.
Baking Your Clouds
1. Divide and Bake: Divide the batter evenly between the two prepared cake pans. Gently spread the batter to the edges. Place the pans in the preheated oven and bake for 25-30 minutes, or until a wooden skewer or toothpick inserted into the center comes out clean. The tops should be golden brown and spring back lightly when touched. Resist the urge to open the oven door too early, as this can cause the cakes to sink.
2. Cooling Process: Once baked, let the cakes cool in their pans on a wire rack for about 10-15 minutes. This allows them to set up a bit before being removed. Then, carefully invert the cakes onto the wire rack to cool completely. It’s crucial that the cakes are entirely cool before frosting, otherwise, the frosting will melt and slide off.
Crafting the Dreamy Frosting
While the cakes are cooling, let’s whip up the dreamy coconut frosting.
1. Whip the Cream: In a chilled bowl, whip the heavy whipping cream with an electric mixer until stiff peaks form. Be careful not to over-whip, or you’ll end up with butter!
2. Beat Cream Cheese and Sugar: In a separate bowl, beat the softened cream cheese and powdered sugar until smooth and creamy. Again, ensure your cream cheese is at room temperature for the smoothest result.
3. Combine and Flavor: Gently fold the whipped cream into the cream cheese mixture. Then, stir in the vanilla extract and coconut extract. Fold until just combined, ensuring you don’t deflate the airy texture of the whipped cream. This frosting is incredibly light and has a wonderful coconut flavor that complements the cake perfectly.
Assembling Your Masterpiece
1. Level and Layer: Once the cakes are completely cool, you can level them if they have domed significantly by carefully slicing off the tops with a serrated knife. Place one cake layer on your serving plate or cake stand. Spread a generous layer of frosting over the top.
2. Add the Second Layer: Carefully place the second cake layer on top of the frosting.
3. Frost the Cake: Apply a thin “crum extractb coat” of frosting all over the cake. This is a light layer that helps to seal in any loose crum extractbs. Chill the cake for about 15-20 minutes to allow the crum extractb coat to set. Once chilled, apply the remaining frosting generously over the top and sides of the cake, creating swirls and peaks to give it that cloud-like appearance.
4. The Finishing Touch: Sprinkle the sweetened shredded coconut all over the top and sides of the cake. If you like a more intense coconut flavor, you can lightly toast the shredded coconut in a dry skillet over medium heat until golden brown before adding it to the cake. Allow the frosting to set for at least 30 minutes before slicing and serving your magnificent Coconut Cloud Cake. Enjoy the light, fluffy texture and the delightful tropical flavors!
Conclusion:
And there you have it – the ultimate Coconut Cloud Cake recipe! This cake is an absolute triumph of fluffy, moist texture and delightful coconut flavor. It’s surprisingly easy to whip up, making it perfect for both begin extractner bakers and seasoned pros looking for a reliably delicious dessert. The airy crum extractb, infused with sweet coconut, truly lives up to its “cloud” name. I’ve found it to be a guaranteed crowd-pleaser, whether served at a special occasion or simply as an afternoon treat. For serving, a dusting of powdered sugar is classic, but I also love it with a light coconut glaze or a dollop of whipped cream. Feel free to experiment with adding toasted shredded coconut on top for extra texture and flavor, or even a hint of lime zest for a tropical twist.
Don’t be intimidated if you’re new to baking; this recipe is quite forgiving. I encourage you to give this Coconut Cloud Cake a try. I’m confident you’ll be just as delighted with the results as I am every time I make it!
Frequently Asked Questions:
Can I make this cake ahead of time?
Yes, absolutely! This Coconut Cloud Cake can be made a day in advance. Store it tightly wrapped at room temperature or in the refrigerator. If refrigerating, let it come to room temperature for about 30 minutes before serving for the best texture.
What kind of coconut milk is best to use?
For this recipe, I highly recommend using full-fat canned coconut milk. This will provide the richest flavor and the most tender crum extractb. Lighter versions might result in a slightly less moist cake.
Can I substitute the flour?
While this recipe is specifically balanced for all-purpose flour, you might be able to use a gluten-free all-purpose flour blend. However, the texture may vary, and I haven’t tested this extensively. It’s best to stick to the recipe as written for optimal results.
Coconut Cloud Cake Recipe
A light and airy cake with a delicate coconut flavor, topped with a creamy frosting and toasted coconut.
Ingredients
-
2 1/2 cups all-purpose flour
-
2 1/2 teaspoons baking powder
-
1/2 teaspoon salt
-
1 cup unsalted butter, softened
-
2 cups granulated sugar
-
4 large eggs, room temperature
-
1 teaspoon vanilla extract
-
1 teaspoon coconut extract
-
1 cup coconut milk
-
1 1/2 cups heavy whipping cream
-
8 oz cream cheese, softened
-
1/2 cup powdered sugar
-
1 cup sweetened shredded coconut
Instructions
-
Step 1
Preheat oven to 350°F (175°C). Grease and flour a 9-inch round cake pan. -
Step 2
In a medium bowl, whisk together flour, baking powder, and salt. -
Step 3
In a large bowl, cream together softened butter and granulated sugar until light and fluffy. Beat in eggs one at a time, then stir in vanilla extract and coconut extract. -
Step 4
Gradually add the dry ingredients to the wet ingredients, alternating with the coconut milk. Mix until just combined, being careful not to overmix. -
Step 5
Pour batter into the prepared cake pan and bake for 30-35 minutes, or until a wooden skewer inserted into the center comes out clean. -
Step 6
Let the cake cool in the pan for 10 minutes before inverting it onto a wire rack to cool completely. -
Step 7
While the cake cools, prepare the frosting. In a large bowl, beat heavy whipping cream until stiff peaks form. In a separate bowl, beat softened cream cheese and powdered sugar until smooth. Add vanilla extract and coconut extract, then fold the whipped cream into the cream cheese mixture. -
Step 8
Frost the cooled cake with the cream cheese frosting. Sprinkle with sweetened shredded coconut.
Important Information
Nutrition Facts (Per Serving)
It is important to consider this information as approximate and not to use it as definitive health advice.
Allergy Information
Please check ingredients for potential allergens and consult a health professional if in doubt.